Overview
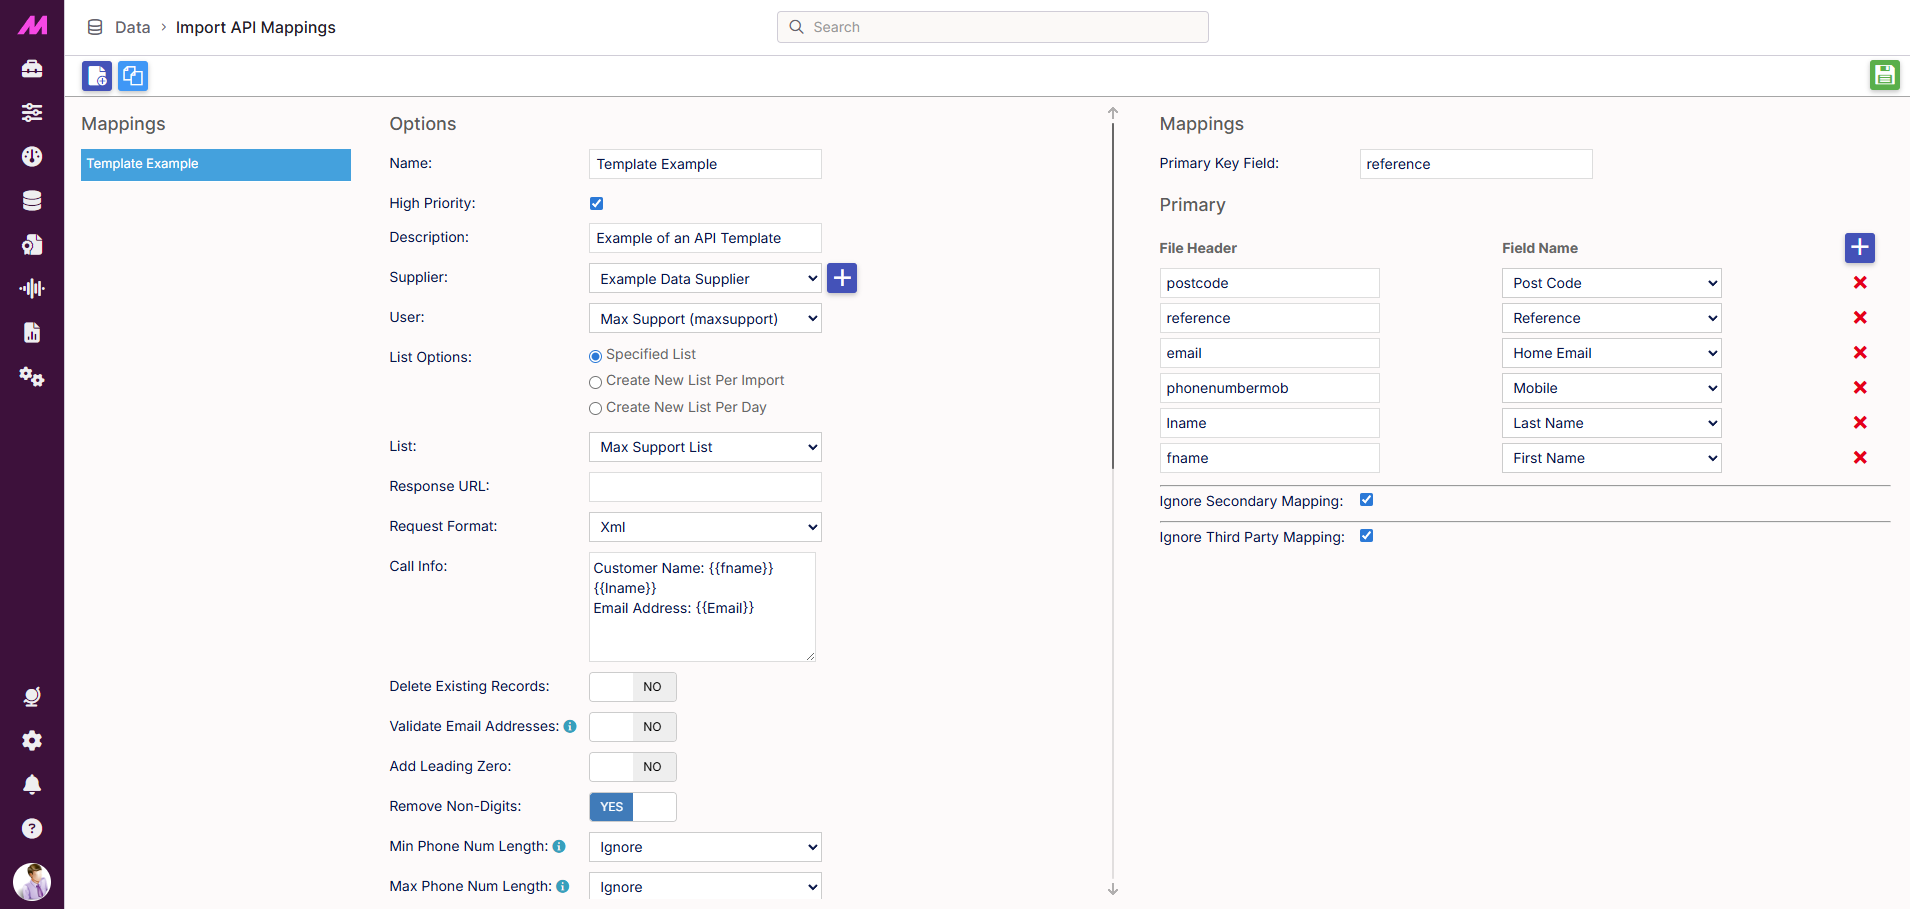
The Import API Mapping page is where you configure the settings and field mappings used by your API lead imports. Each configuration is saved as a template, which your API integration references when sending data into the system.
To access it, go to Data > Data Handling > Import API Mapping.
Note. If you are using API imports, your initial mappings will be configured by the installations team during onboarding. You will typically only need this page when adding new API imports or cloning and adjusting an existing configuration.
For full details on the API integration itself, see the Lead Management API article.
Page controls
| Control | Description |
|---|---|
| New | Creates a new API import template. The new template will not appear in the templates list until it has been saved. |
| Clone | Creates a copy of the currently selected template with all its settings and mappings intact. Useful when adding a new import that is similar to an existing one. |
| Save | Saves any changes made to the selected template. |

Templates
The left-hand panel lists all API import templates configured on your system. Select a template to view and edit its Options and Mappings in the right-hand panel.
Options
The Options section controls how the API import processes incoming data — covering data handling, deduplication, phone number formatting, and DNC checking. These settings mirror those available in the manual Import Leads process.
General
| Field | Description |
|---|---|
| Name * | The name of this API import template. Use something descriptive so it can be identified in the list. Required. |
| Description | An optional description to help distinguish this template from others on the system. |
| High priority | When checked, pushes this import to the front of the processing queue. Particularly useful for web lead imports where speed of contact is important. |
| Supplier * | Select the supplier associated with this import. If the required supplier does not appear in the dropdown, click the icon next to it to add a new one. Required. |
| User * | Select the system user account designated for API imports. A dedicated user with its own username and password should already be set up on your system for this purpose. Required. |
* Required field
List options
| Option | Description |
|---|---|
| Specified list | All data from this import is added to a single, fixed list. Select the destination list from the dropdown. |
| Create new list per import | A new list is created each time an import runs using this template. Select a list to clone from and enter a prefix for the list name — the import date is automatically appended. |
| Create new list per day | A new list is created once per day for all imports using this template on that day. Configuration options are the same as Create new list per import. |
API settings
| Field | Description |
|---|---|
| Response URL | A URL the system sends a POST request to once an import has completed or failed. The format of the response (JSON or XML) is determined by the Request format setting. |
| Request format | Sets the format of the API request — either XML or JSON. |
Data handling
| Setting | Description |
|---|---|
| Call info | Configures what agents see in the right-hand panel of Contact Hub during a call. Free text — use double curly brackets {{ }} to reference lead fields dynamically, for example Name — {{first_name}} {{last_name}}. |
| Delete existing records | When enabled, all existing leads on the destination list are deleted before the new import is processed. Note. This action is irreversible — deleted records cannot be recovered. Use with caution. |
| Keep existing callbacks | If Delete existing records is set to Yes, a second toggle appears: choose whether leads with callbacks should be kept or removed. Yes: existing leads and callbacks remain unaffected. No: existing leads and callbacks are deleted, and the new leads are imported in their place |
| Add leading zero | When checked, a leading zero is automatically prepended to any phone numbers that are missing one. |
| Remove non-digits | When checked, any non-numeric characters (such as +, -, #) are stripped from phone numbers on import. |
| Min phone number length | Any phone number with fewer digits than this value will be rejected on import. Verify your data before setting this value to avoid discarding valid records. |
| Max phone number length | Any phone number with more digits than this value will be rejected on import. Verify your data before setting this value to avoid discarding valid records. |
| Truncate extra digits | Removes any digits after the |
| Check DNC | When checked, each number in the import is compared against your DNC lists. Any matching numbers are excluded from the import. Select which DNC categories to check against — IVR, Imported, and Requested are available by default. |
| Deduplication | When enabled, checks for duplicate records. Four scope options are available: File uploaded — checks for duplicates within the import file only Dedupe against the destination list — checks against records already on the import destination list Dedupe against additional lists — checks against specific lists you select Global (entire database) — checks across all records on the system Action — determines what happens when a duplicate is found: Keep existing — retains the existing record and rejects the incoming duplicate Keep new — replaces the existing record with the incoming one Reset older — resets the existing record's call attempts, making it eligible to dial again, and rejects the incoming record |
| Default Skill Group | This setting will only display if your system has Outbound Skill-Based Routing enabled. Allows you to set a default Outbound Skill Group to the imported leads. Useful if some or all of the leads in your import file have no Skill Group specified. Opt for 'None' if you are assigning Skill Groups directly in your import file. For more information on Outbound Skill, check out the following articles |
| Clear Fetched Data | Flushes campaigns, clearing any leads sitting in the dialler buffer waiting to be called. Use this alongside deduplication to prevent the same contact being called twice — once from the buffer and once from the newly imported record. Example: A lead is in the buffer about to be dialled. You import the same lead with updated details. Without flushing, both versions could be called. With flushing enabled, the buffered version is removed before the new one is imported. |
| Static time zone | When enabled, all leads from this import are tagged with a specific time zone, ensuring they are only dialled within the appropriate calling hours for that region. Select the time zone from the Default time zone dropdown that appears. Most UK-only operations do not need this enabled. |
| Calling code | Prepends a calling code to imported numbers where required. Typically used for international numbers imported without a country dialling prefix. |
| Enable Import Expiry | When enabled, sets an expiry date on the imported data. At midnight on the expiry date, all leads from this import — along with any associated callbacks — are automatically removed from the system. Example: A BPO running a short-term promotional campaign imports data onto a specific list and sets the expiry date to the last day of the promotion. After that date, the leads are automatically removed without manual cleanup. |
| Expire option | Choose between Expire on a specific date or Expire in a number of days from the import date. |
| Expire on date | Set the specific date the data will expire (at midnight). Only visible when Expire option is set to a specific date. |
| Expire in days | Set the number of days from the import date after which the data will expire. Only visible when Expire option is set to a number of days. |
Mappings
The Mappings section connects the fields in your API data to the corresponding fields in MaxContact. This ensures incoming data is stored correctly and displayed to agents during calls.
Primary mapping
Maps your API data fields to the standard lead fields in MaxContact (for example, mapping an incoming firstname field to the MaxContact First Name field). Click the + button to add a new mapping row.
| Field | Description |
|---|---|
| File header | The field name as it appears in your API data — for example, a CSV column header. |
| Field name | The corresponding standard field in MaxContact that this data should be mapped to. |
| Ignore secondary mapping | When unticked (default), secondary field mapping is also applied. Tick this to skip secondary mapping entirely for this template. |
Secondary mapping
Maps your API data fields to a secondary (custom) data table on the system. This works in the same way as primary mapping but targets bespoke fields rather than the standard lead table. Click the + button to add a new mapping row.
| Field | Description |
|---|---|
| Secondary table | Select the custom data table on the system to map secondary fields to. |
| File header | The field name as it appears in your API data. |
| Field name | The corresponding field in the selected secondary data table. |
Note. The Primary key field and Third party sections visible on this page are no longer in use and can be ignored.