
Overview
The CTU page is where you create and configure the campaigns, teams, and users on your system. The page is split into two main areas: the three columns on the left (Campaigns, Teams, Users) and the configuration panel on the right, which updates based on what you have selected.
To access it, go to Management > General > CTU.
You can create as many campaigns, teams, and users as you need. There is no system limit on the number of users — however, only the number of agents equivalent to your licence count can be actively dialling at any one time. If you need to increase your licence count, contact your account manager.
Note. Nothing on the CTU page can be permanently deleted. Items can only be set to inactive, which hides them from default views and prevents them from being used. This is intentional — it means accidental deactivations can always be reversed without losing any configuration.
Page controls
| Control | Description |
|---|---|
| New campaign | Creates a new campaign and opens a blank configuration panel on the right. |
New team | Creates a new team and opens a blank configuration panel on the right. |
New user | Creates a new user and opens a blank configuration panel on the right. |
Clone | Creates a copy of the currently selected campaign, team, or user with all its settings. Useful when adding a new item that is similar to an existing one. |
Bulk user upload | Takes you to the Bulk User Upload page where you can create multiple users at once by uploading a CSV file. See the Bulk User Upload article for full details. |
| Filter | Filters the campaign, team, and user lists to show All, Active, Inactive, or Locked items. Locked applies to users who have been locked out due to failing password policy rules. |
Enable local authentication | Enables local authentication for all SSO users. See the Single Sign-On (SAML) guide for more detail. |
Save | Saves any changes or additions made on the page. Always save before navigating away — you will be warned if you attempt to move to a different item on the page without saving, but not if you navigate away from the page entirely. |
Campaigns
Campaigns are the core operational unit in MaxContact. Each campaign brings together a dialling type, a set of lists, a team of agents, and a configuration of how calls or interactions are handled. You can create as many campaigns as you need, and they can be structured however suits your operation.
Calling campaigns have three configuration tabs: Editing, Alerts, and Zip Tones. Interaction campaigns only have the Editing tab.
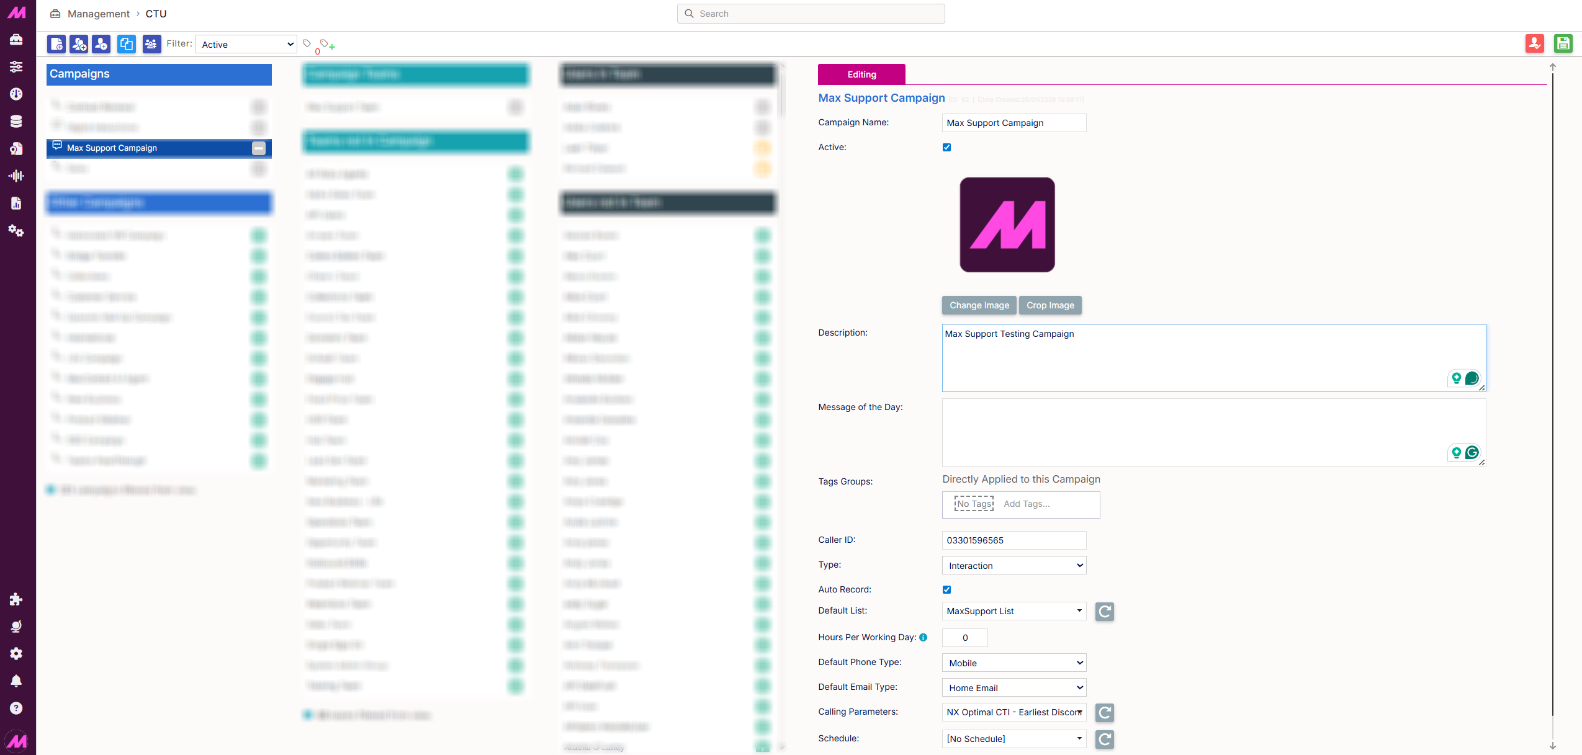
Editing tab
The following fields are available for all campaign types unless otherwise noted.
| Field | Description |
|---|---|
| Campaign name | The name of the campaign. Visible in the Campaign Manager, reports, and dashboards. |
| Active | When ticked, the campaign is visible and available to run. When unticked, it is hidden by default and cannot be used. |
| Image | An optional image for the campaign. Can be displayed on dashboards and wallboards. Note: when an image is changed, there is a 6-hour cache — clearing your browser cache and cookies will force an immediate reload. |
| Description | A description of what the campaign is for. Useful for other staff who may become involved in managing it. |
| Message of the day | Any text entered here is displayed to agents in a dialogue box when they log into the campaign. Useful for daily briefing notes or reminders. |
| Tag Groups | When tagging is enabled, you can apply tag groups directly to a campaign. These will be inherited by any associated teams and users. For more information, see Tagging. |
| Caller ID | The phone number presented to customers on outbound calls. Numbers are ordered or ported during onboarding. There are Ofcom rules around number presentation — ensure you are aware of the relevant rules for your industry. |
| Withhold number | Allows you to present no caller ID to customers. This feature must be enabled by your account manager before it can be used — if it has not been enabled, calls will not connect when a withheld number is set. When enabled, this setting overrides all other caller ID values set at lead, list, or campaign level, and applies to all call types including transfers, callbacks, and manual dials. Strict regulations apply — only valid circumstances as agreed with MaxContact carriers will be permitted. |
| Type | Sets the campaign dialling type. See the Campaign types section below for full details of each option and the additional settings each one makes available. |
| Auto record | When ticked (default), all calls through this campaign are recorded. MaxContact does not delete call recordings unless you request it. |
| Default list | The list where new leads are created and stored when a previously unknown number calls in or is dialled manually. This list is also used as the fallback for reporting purposes where no other list assignment applies. |
| Default phone type | Sets the default phone type (Home, Work, or Mobile) applied when a new lead is created by the campaign. |
| Hours per working day | Sets the expected working hours per day for this campaign. Used to track successes against a daily target. Can be reported on and displayed on dashboards and wallboards. See the Hours per working day guide for more detail. |
| Calling parameters | Advanced dialling settings configured by MaxContact during onboarding. These are rarely changed after go-live. See the Plans article for more on calling parameters. |
| Schedule | Assigns a calling schedule to the campaign, restricting when it will dial. Schedules are created and managed in Plans. |
Campaign types
The Type dropdown controls how the campaign operates. Selecting a type may reveal additional settings specific to that mode.
| Type | Description |
|---|---|
| Predictive | The fastest outbound dialling mode. The system dials multiple leads simultaneously and distributes answered calls to available agents. A minimum of 6 agents is recommended. A dropped call message must be uploaded to the system before going live. Ofcom has strict rules on dropped call rates — ensure your operation is aware of and compliant with these. Additional settings available for Predictive: Degrade to progressive. Automatically switches the campaign to progressive when the number of logged-in agents falls below a configured threshold (1–20). The campaign returns to predictive once agent numbers recover. Useful around breaks and shift changes. Drop rate (%). Sets the maximum acceptable drop rate. The system adjusts dialling speed to stay at or below this target. In the UK, MaxContact recommends setting this to 0 to keep drops as close to zero as possible. Undroppable. Activates an alternative dialling algorithm that aims to keep the drop rate as close to 0% as possible while still dialling predictively. When enabled, the drop rate (%) setting is bypassed. Enable Skill Based Routing. When ticked, Outbound Skill-Based Routing (OSBR) is active for this campaign. Calls are distributed to agents based on their assigned skills and skill groups, allowing you to match leads to the most appropriate agent for that call. For more detail, see the Outbound Skill-Based Routing article. Not ready wait time. Sets how long an agent stays in ready before a Go Not Ready button appears, allowing them to change status if no call has been placed to them. |
| Progressive | Dials one lead per available agent. Also allows inbound calls. Dropped calls should not occur in progressive mode. Additional settings available for Progressive: Drop rate (%). Can be set if required, though uncommon in progressive mode. Increase to predictive. Automatically switches the campaign to predictive when the number of logged-in agents reaches a configured threshold (up to 20). Enable Skill Based Routing. When ticked, Outbound Skill-Based Routing (OSBR) is active for this campaign. Calls are distributed to agents based on their assigned skills and skill groups, allowing you to match leads to the most appropriate agent for that call. For more detail, see the Outbound Skill-Based Routing article. Not ready wait time. Same function as for Predictive above. |
| Preview | Presents lead information to the agent before dialling begins. The system will dial automatically after a configurable preview period, or agents can be given the option to skip to the next lead. The Preview Call Timeout is configured in Plans — Calling Parameters. Additional settings available for Preview: Enable Skill Based Routing. When ticked, Outbound Skill-Based Routing (OSBR) is active for this campaign. Calls are distributed to agents based on their assigned skills and skill groups, allowing you to match leads to the most appropriate agent for that call. For more detail, see the Outbound Skill-Based Routing article. |
| IVR | Used for automated message blasting. The system calls leads and plays a pre-recorded message on answer. Typically used where customers have opted in to receive automated messages. Lines. Sets the number of lines used to dial out on the IVR campaign. |
| Bridge | Used to handle calls transferred from an IVR to an external number. Typically set up by your onboarding engineer. Lines. Limits the number of concurrent transfers over the bridge campaign (0–999). |
| Inbound | For campaigns where agents receive inbound calls only. No outbound calls are made automatically. Agents can still manual dial when needed. Common uses include customer service departments and internal IT support lines. |
| Interaction | Handles all digital channels — webchat, email, SMS, WhatsApp, and Facebook. One interaction campaign can handle all channels, or you can create separate campaigns per channel or client for reporting purposes. The Alerts and Zip Tones tabs are not available for interaction campaigns. Default email type. Sets the default email type (Home or Work) applied to uncontacted leads. |
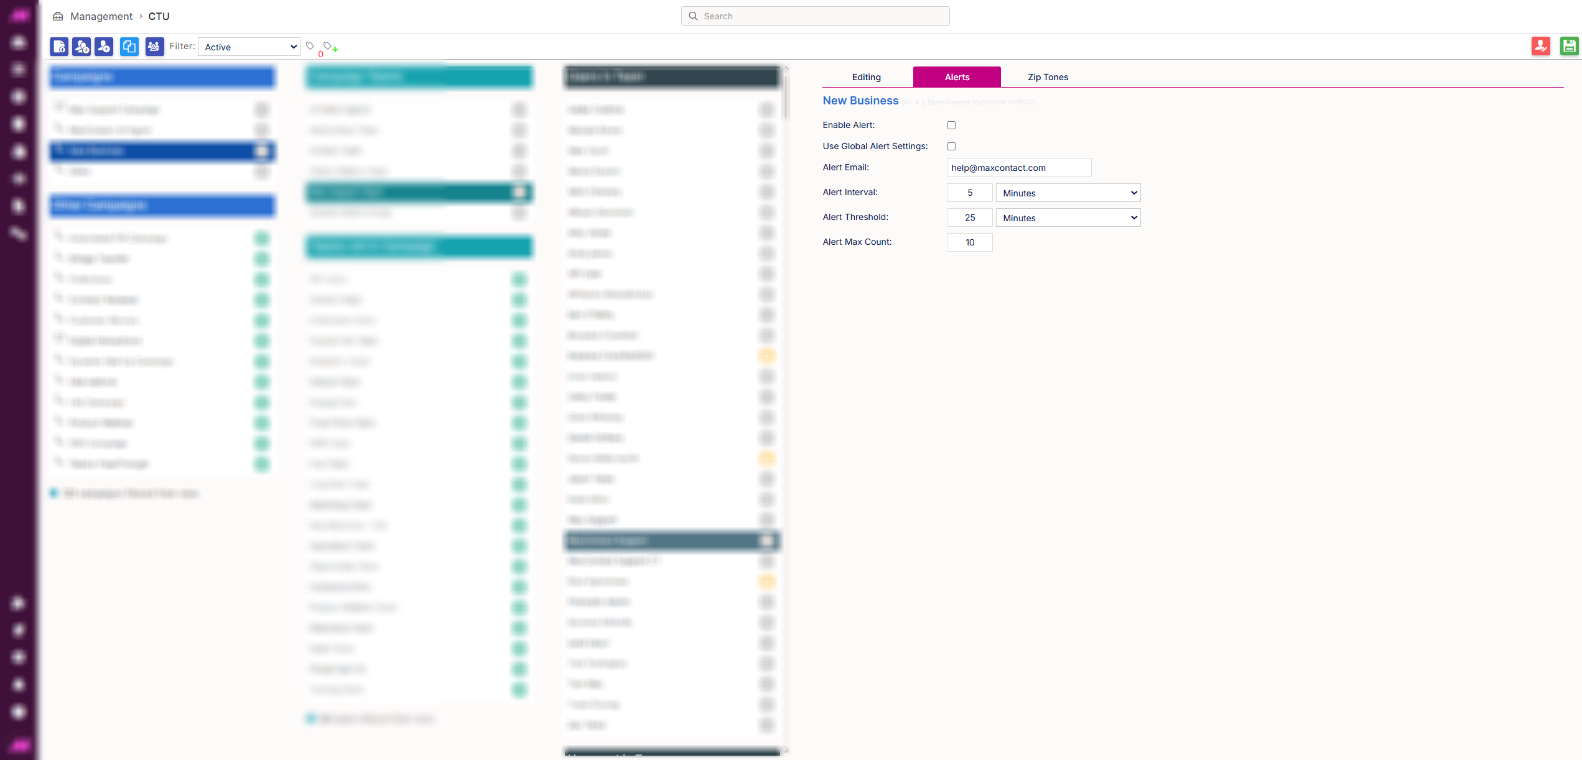
Alerts tab
The Alerts tab lets you configure automated email notifications when data levels in the campaign drop below a threshold. Not available for interaction campaigns.
| Setting | Description |
|---|---|
| Enable alert | Turns data alerts on for this campaign. When enabled, alerts appear on the Campaign Manager page and are sent via email. |
| Use global alert settings | When selected, this campaign uses the system-wide alert settings configured in the Settings page. If selected, the campaign-specific fields below do not apply. |
| Alert email | The email address(es) to send alerts to. A maximum of two addresses can be entered. |
| Alert interval | How frequently alert emails are sent once the threshold has been reached. |
| Alert threshold | The data level at which the first alert is triggered. For example, entering 1 hour sends the first email when data is estimated to run out within one hour. Each subsequent email reflects an updated estimate. |
| Alert max count | The maximum number of alerts sent before stopping. Alerts also stop automatically if more data is added or the campaign runs out of data before the maximum is reached. |
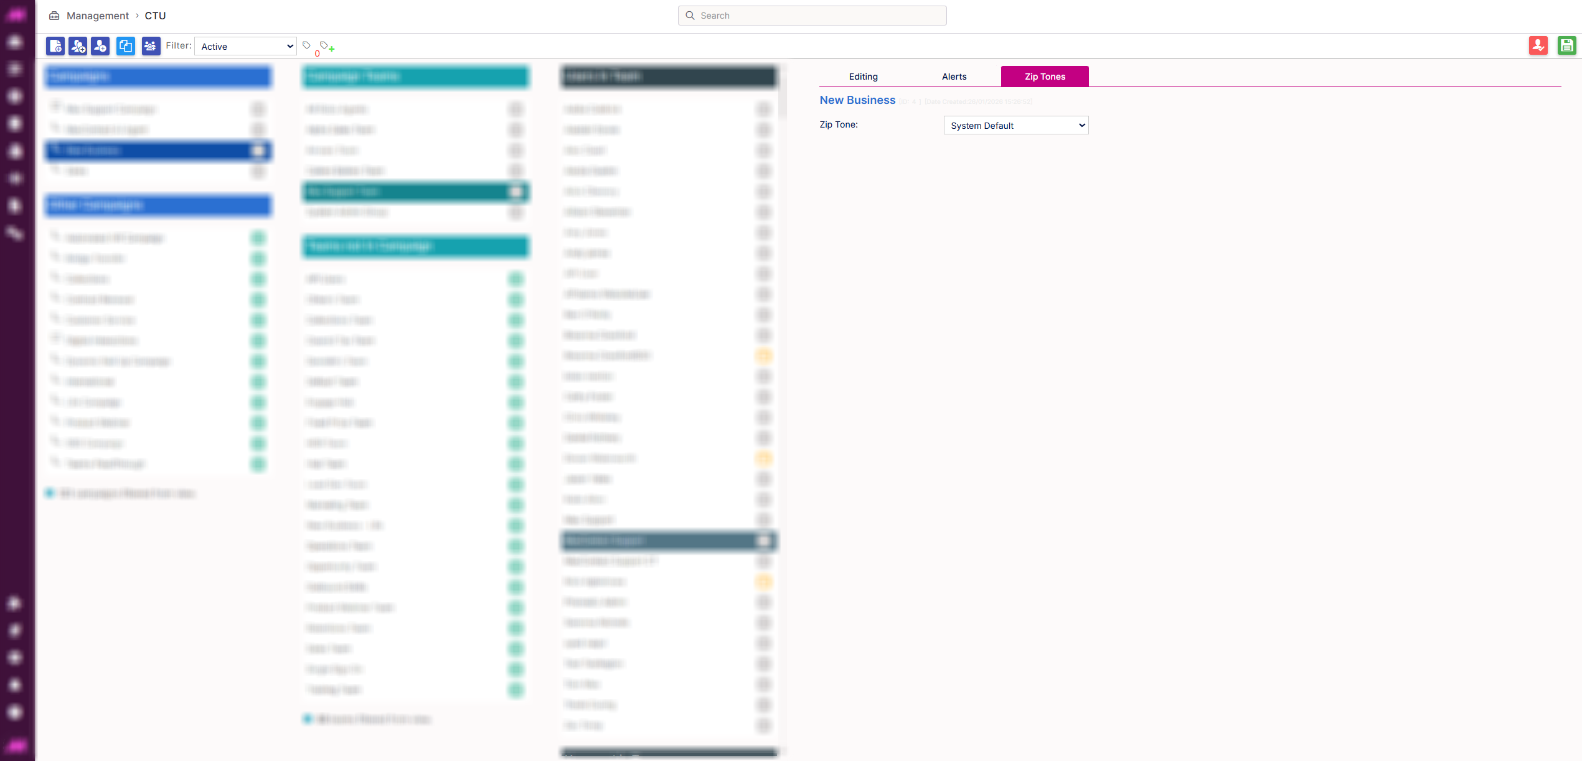
Zip Tones tab
Zip tones (also known as whispers) are short audio cues played in an agent's headset when a call connects. This tab lets you configure a tone for this specific campaign. Not available for interaction campaigns.
| Option | Description |
|---|---|
| System default | Uses the standard system beep. |
| Beep | Presents a second dropdown with a selection of different beep tones to choose from. |
| WAV file | Plays a pre-recorded WAV file uploaded to the system. WAV files must be 2 seconds or shorter. Files can be uploaded during onboarding or with assistance from the support team. A dropdown shows all available WAV files. |
Zip tones can also be applied to inbound queues. See the Queues guide for more detail.
Teams
Teams are the link between users and campaigns. Assigning a team to a campaign gives the users in that team access to log into it. You can create as many teams as you need and structure them however suits your operation — by department, by campaign, by supervisor, or any other grouping that makes sense for your business.
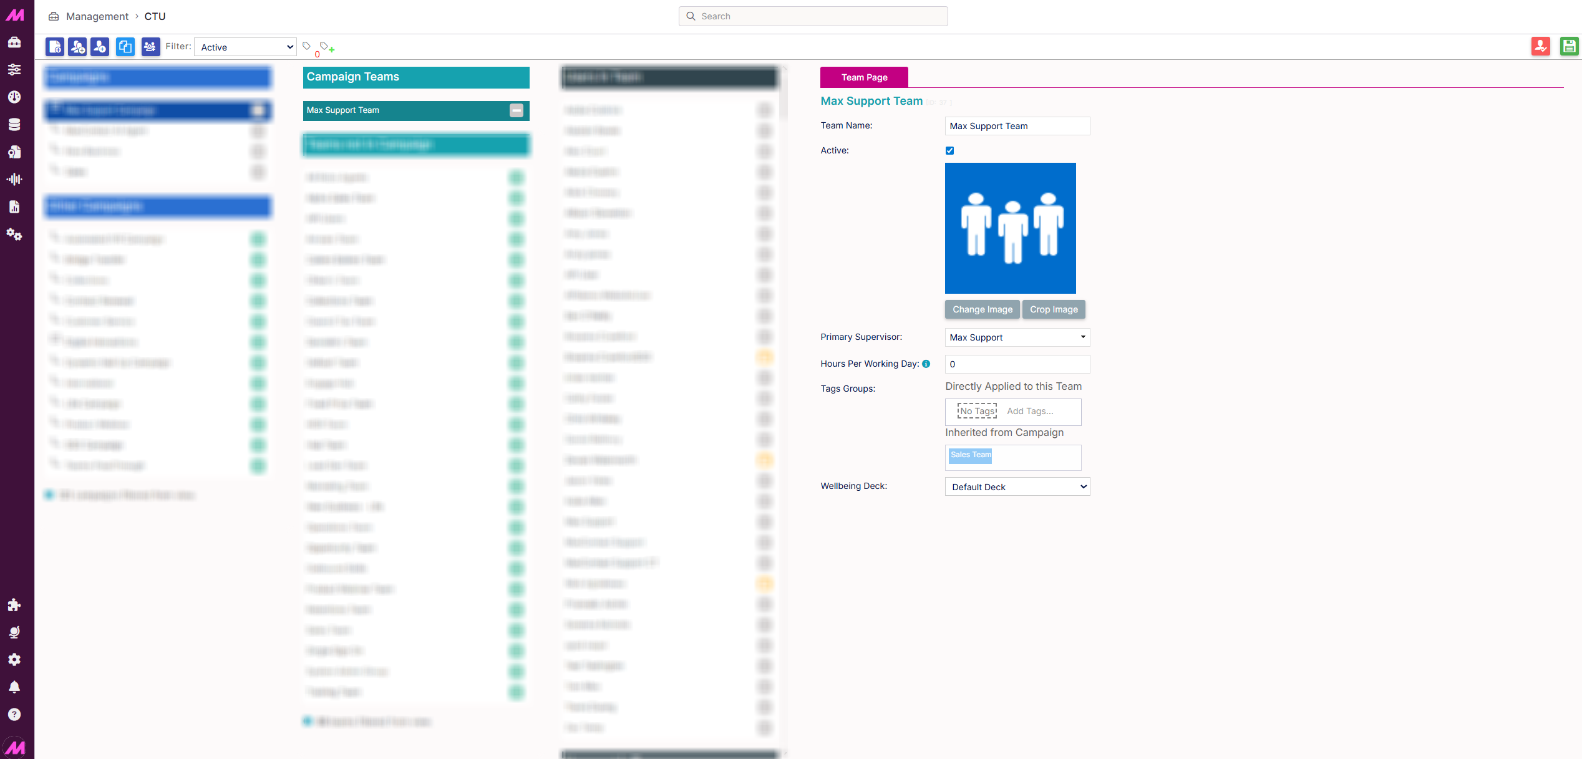
Creating and editing a team
Click New team to create a blank team, or select an existing team from the left-hand column to edit it. The configuration panel on the right will update to show that team's settings.
| Field | Description |
|---|---|
| Team name | The name of the team. Visible on dashboards, wallboards, and reports where team-level data is shown. |
| Active | When ticked, the team is visible and users can be added to or removed from it. When unticked, the team is hidden by default. |
| Image | An optional image to represent the team on dashboards and wallboards. |
| Primary supervisor | The user designated as the team's supervisor. Their name appears on team-level reports, making it easy to identify who is responsible for each team's performance. |
| Hours per working day | Sets the expected working hours per day for this team. Used to track team successes against a daily target. Can be reported on and displayed live on dashboards and wallboards. See the Hours per working day guide for more detail. |
| Tag Groups | When tagging is enabled, you can apply tag groups directly to a team and view any tag groups inherited from its associated campaigns. For more information, see Tagging. |
| Wellbeing Deck | Sets the wellbeing deck displayed to users while they work in Contact Hub, or leave blank to show none. |
Adding and removing users from a team
When a team is selected, the middle column updates to show Users in team at the top and users not yet in the team below. Click the + symbol next to a user to add them to the team, or the – symbol to remove them. Click Save once done.
Users
You can create as many users as you need on the system. There is no limit on the number of user accounts, so each administrator, supervisor, and agent can have their own individual login. Only the equivalent number of users to your licence count can be actively dialling at any one time.
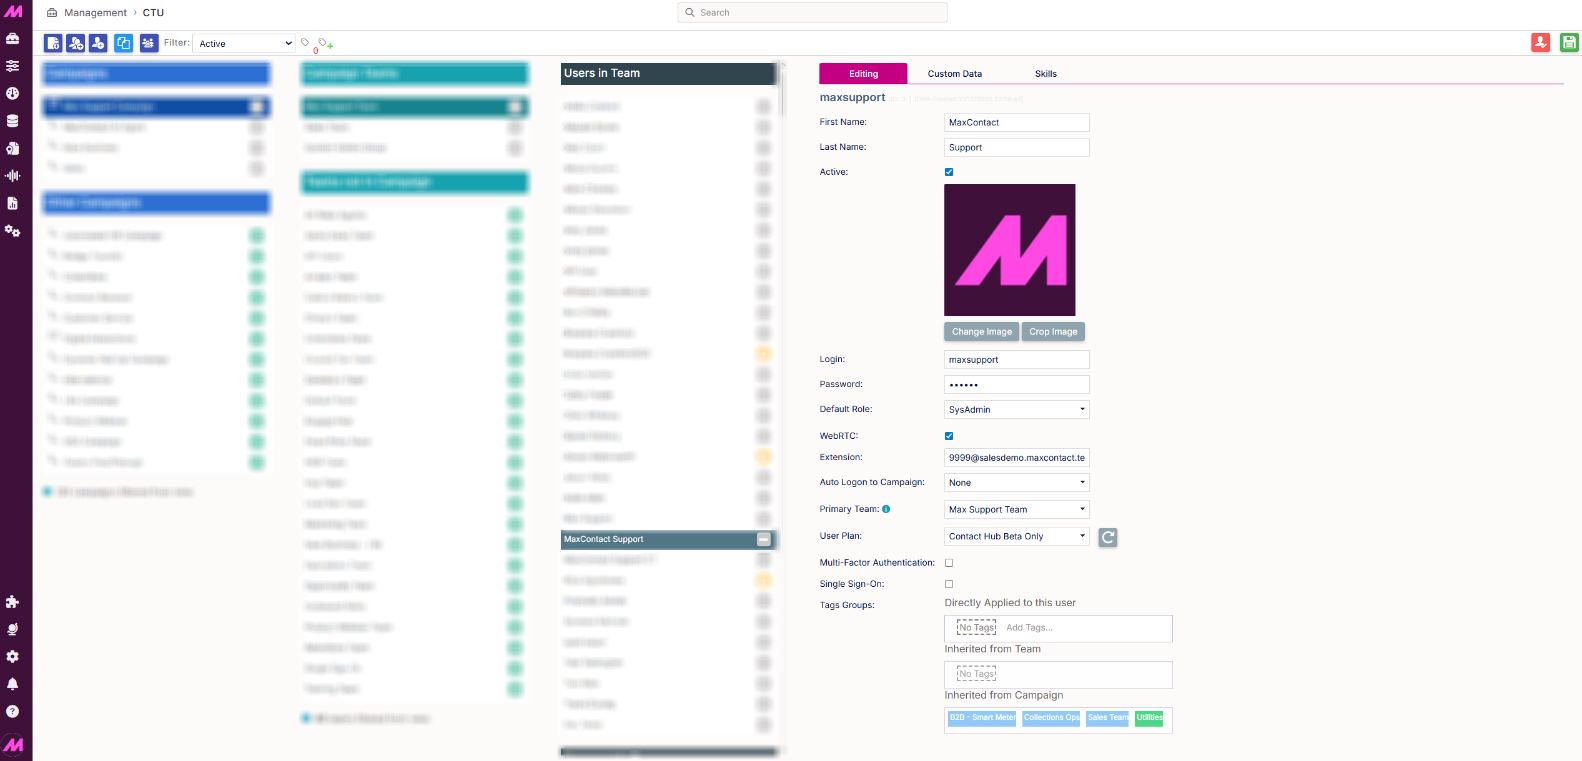
To add a user, click New user at the top of the page. The user configuration panel appears on the right with up to three tabs: Editing, Custom data and Skills.
Note. Your system includes a MaxSupport user account. This account is used by the MaxContact support team to securely access your system when providing assistance or troubleshooting issues. Please do not edit or deactivate this account.
Editing tab
| Field | Description |
|---|---|
| First name | The user's first name. |
| Last name | The user's last name. |
| Active | When ticked, the user is visible on relevant pages and can log into the system. When unticked, the user is hidden by default and cannot log in. This is the way to deactivate a user without permanently removing them. |
| Change image | Upload a profile image for the user. Can be displayed on dashboards and wallboards where a user-level view is configured. |
| Login | The user's login username. Automatically generated from the first initial and surname when you enter the user's name, but can be changed by typing over it. |
| Password | The user's initial password. It is best practice to set a generic password at creation — users can change their own password once they have logged in. Password policies can be set at the role level to enforce complexity rules and require a change on first login. |
| Default role | The permission role assigned to the user. This controls what areas of the system they can access and what actions they can perform. Six default roles are available, from Agent (contact centre access only) through to SysAdmin (full access). Custom roles can be created in the Permissions page. See the Default roles in MaxContact guide for a breakdown of each role. |
| WebRTC | When ticked, the user connects their audio via the built-in browser-based connection. This is the recommended method for most customers and does not require third-party software. Your onboarding engineer will confirm whether WebRTC is the right approach for your setup. |
| Extension | Used where WebRTC is not suitable and the user needs to connect via a third-party softphone or physical handset. Your onboarding engineer will confirm if this is required for your setup. |
| Auto logon to campaign | When a campaign is selected here, the user is automatically logged into that campaign each time they start. They can still log out and switch to a different campaign after logging in, but will always begin on the assigned campaign from a fully logged-out state. |
| Primary team | Assigns the user to a team at the point of creation. The team must already exist before it can be selected here. If the required team does not exist yet, assign the user to a temporary team and move them once the correct team is created. Ensure you also remove them from the temporary team at that point. This team will be which they are associated to when running user-level reports. |
| User plan | Assign a user plan to configure specific settings for the user, including capacity, Dynamic Nailup, and Outbound Skill-Based Routing (OSBR). For more information, see User Plans. |
| Single Sign-On | When ticked, the user logs in via your SSO provider. See the Single Sign-On (SAML) guide for full setup detail. |
| Tag Groups | When tagging is enabled, you can apply tag groups directly to a user and view any tag groups inherited from their associated teams and campaigns. For more information, see Tagging. |
Custom data tab
The Custom data tab is relevant for customers using email interactions. It allows you to store custom data fields against a user — most commonly used to set up individual email signatures that can be automatically applied when an agent sends an email via a script or interaction template.
Once entered, these values can be referenced in email templates across the system and will be automatically populated with the sending agent's information. Custom data fields can also be used in conjunction with SSO. See the Custom data user fields for email signatures guide for more detail.
Skills tab
This tab only appears if Outbound Skill-Based Routing is enabled on your system. From here, you can assign skills directly to a user and set their individual proficiency level. You can also review any skills inherited through their assigned User Plan.