Overview
The Import Leads page is where you manually upload data to the system from a CSV file. There are five stages to the import process:
Details, Settings, Lead Mapping, Call Info, and Secondary/Script Mapping.
To access it, go to Data > Import Leads.
Note. There are other ways to get data into the system (API imports, for example) — these are configured during onboarding by your engineer. This article covers manual CSV imports only.
Before you import
Your CSV file needs to be formatted correctly before uploading:
- Data must be organised into columns with clear headers
- Remove any rogue commas, special characters, or columns you don't need to import
- Save the file in .csv format — no other file types are accepted
- Maximum file size is 50MB
- There is no limit on the number of records per file, but very large imports (tens of thousands of records) will take longer, particularly if the system is actively dialling
Note. Do not format numbers with a +44 country code prefix. Although the system will accept them and dial out correctly, inbound calls from those contacts will start with 0 and won't match the lead record — preventing the contact from being identified on an inbound call.
Note. For GDPR reasons, MaxContact cannot accept data files to upload on your behalf — either during onboarding or via support channels. Your data is stored securely on your portal, and access is audited. Files sent by email are not. If you need help with the import process, further training can be arranged, or our support team can walk you through it via screen share.
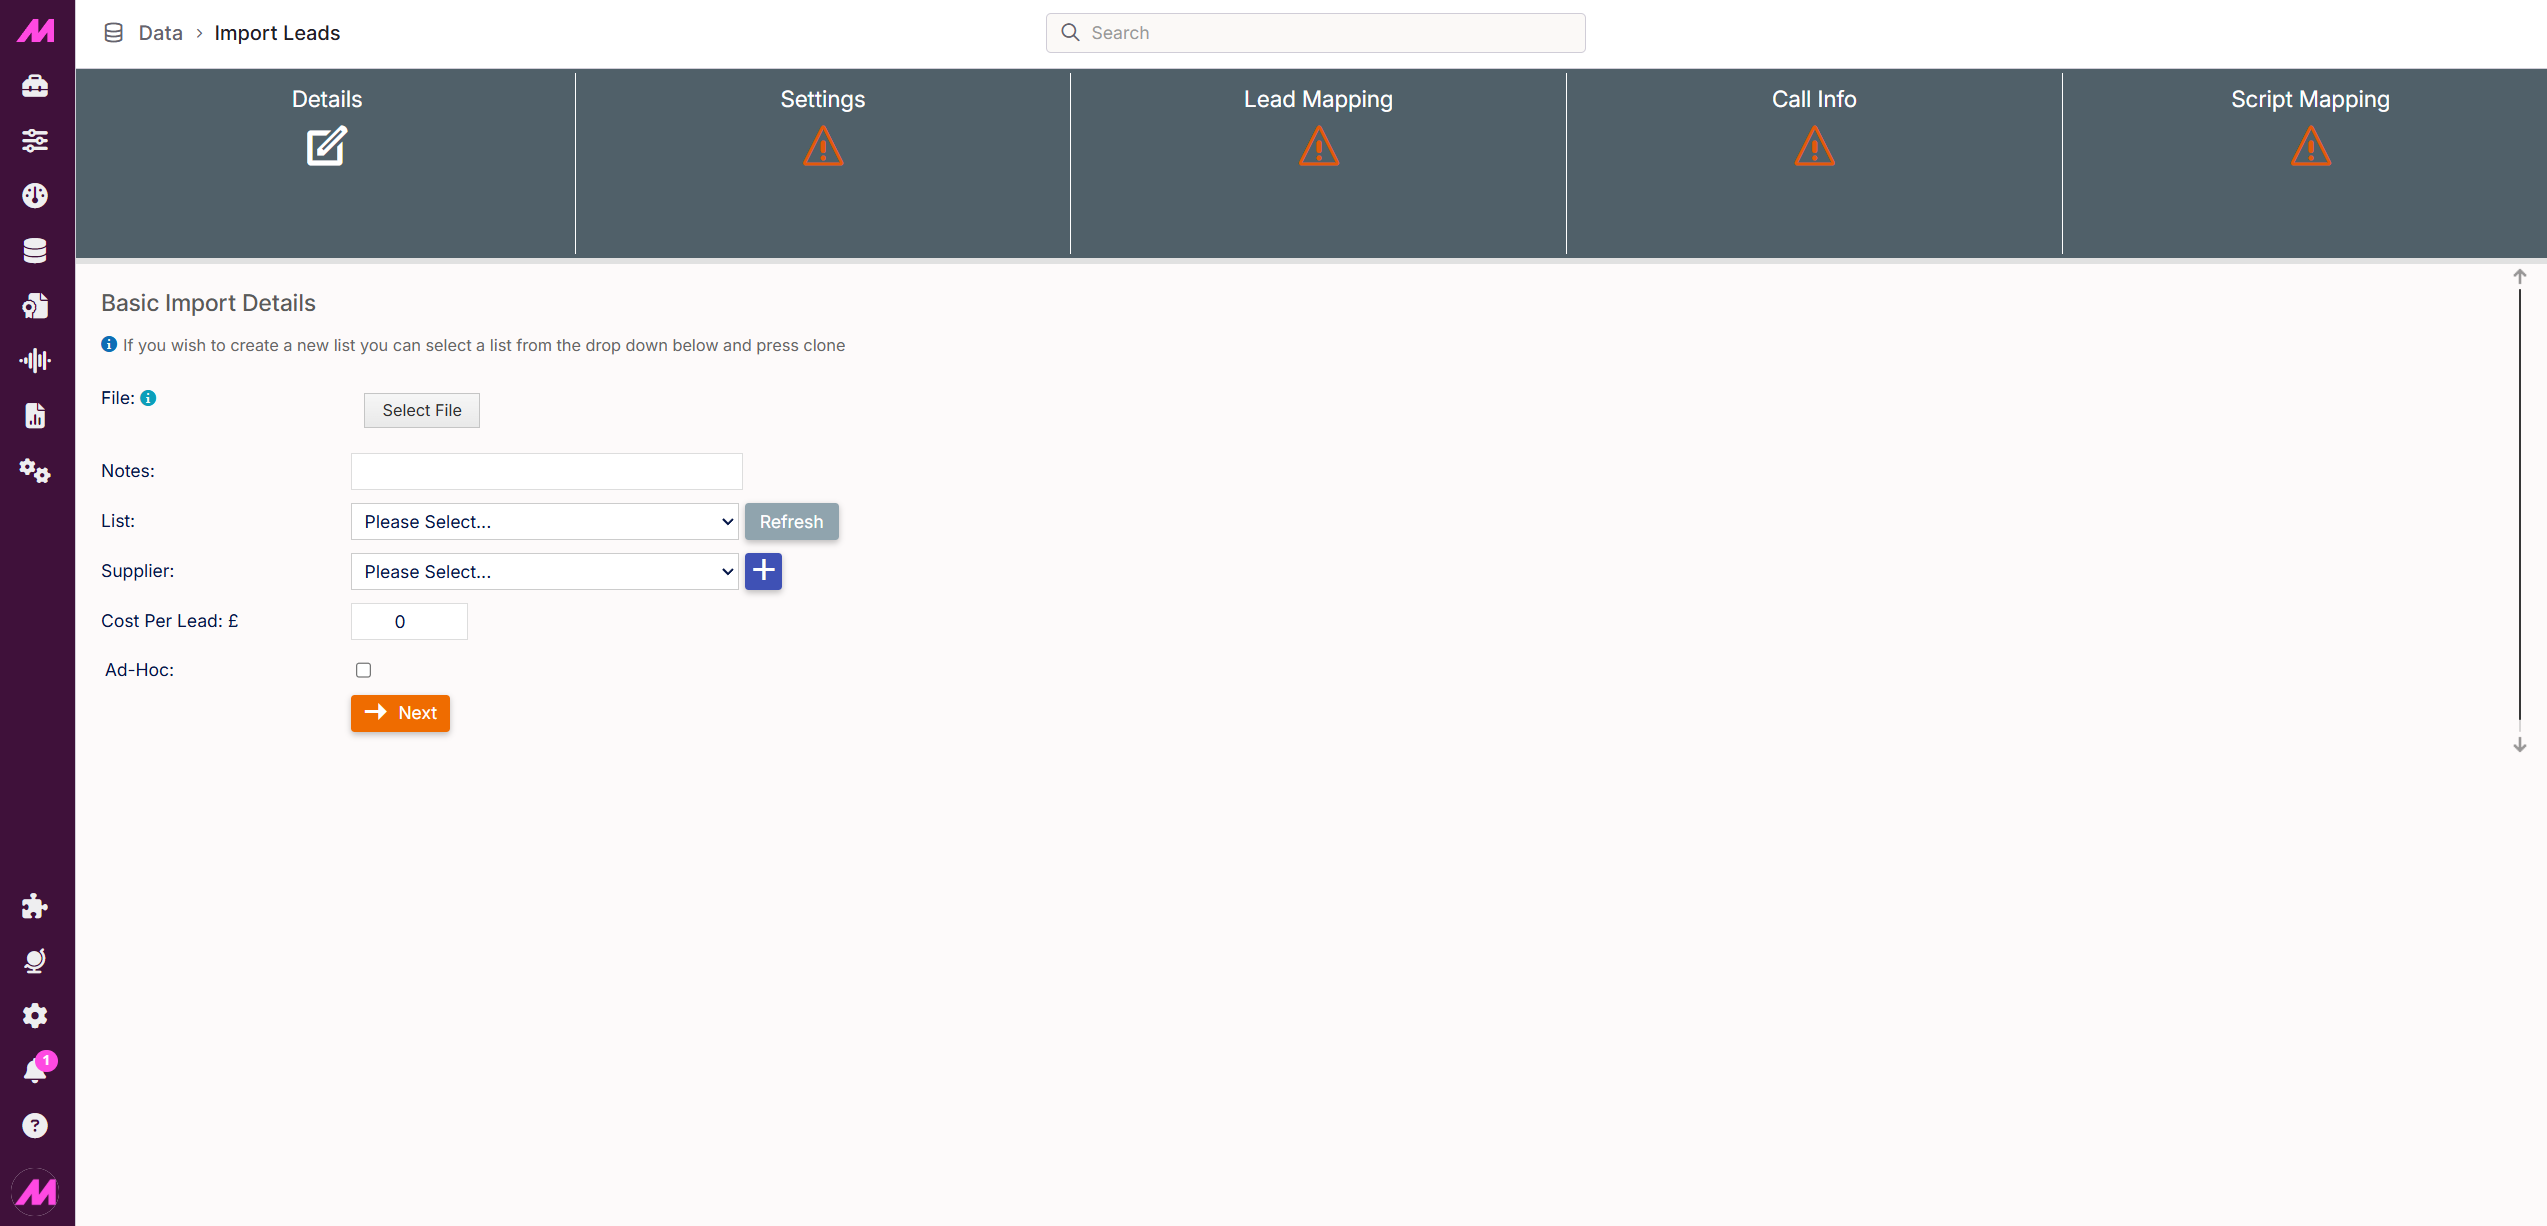
Stage 1: Details
The Details stage is where you select your file and set the basic information for the import.
| Field | Description |
|---|---|
| File * | Click Select file and navigate to your CSV file. Once selected, a 100% progress indicator will appear alongside the filename and file size. Required. |
| Notes | Optional free-text field for recording details about the import — for example, what the data is, where it came from, or why it was imported. Useful for other users who may need to refer to the import later. |
| List * | Select the destination list for the import from the dropdown. If a recently created list isn't showing, click Refresh. You can also clone an existing list from here — useful if you run the same import regularly and only need to change the list name or date. Required. |
| Supplier * | Records where the data came from. Used in the Supplier Summary report alongside Cost per lead. If you're not reporting on data sources, enter your own company name. Required. |
| Cost per lead | Optional. Enter the cost per lead for this import to populate cost data in the Supplier Summary report. |
| Ad-hoc | When unticked, the system saves your import settings and mappings for reuse on future imports — saving time on repeated uploads. When ticked, the import is treated as a one-off, and no settings are saved. Leave unticked for regular imports. |
* Required field
Use case example. A sales company imports data from multiple suppliers. They split each import by supplier, enter the cost per lead, and leave Ad-hoc unticked so the settings carry over to the next import. The Supplier Summary report then shows them the cost and performance per data source.
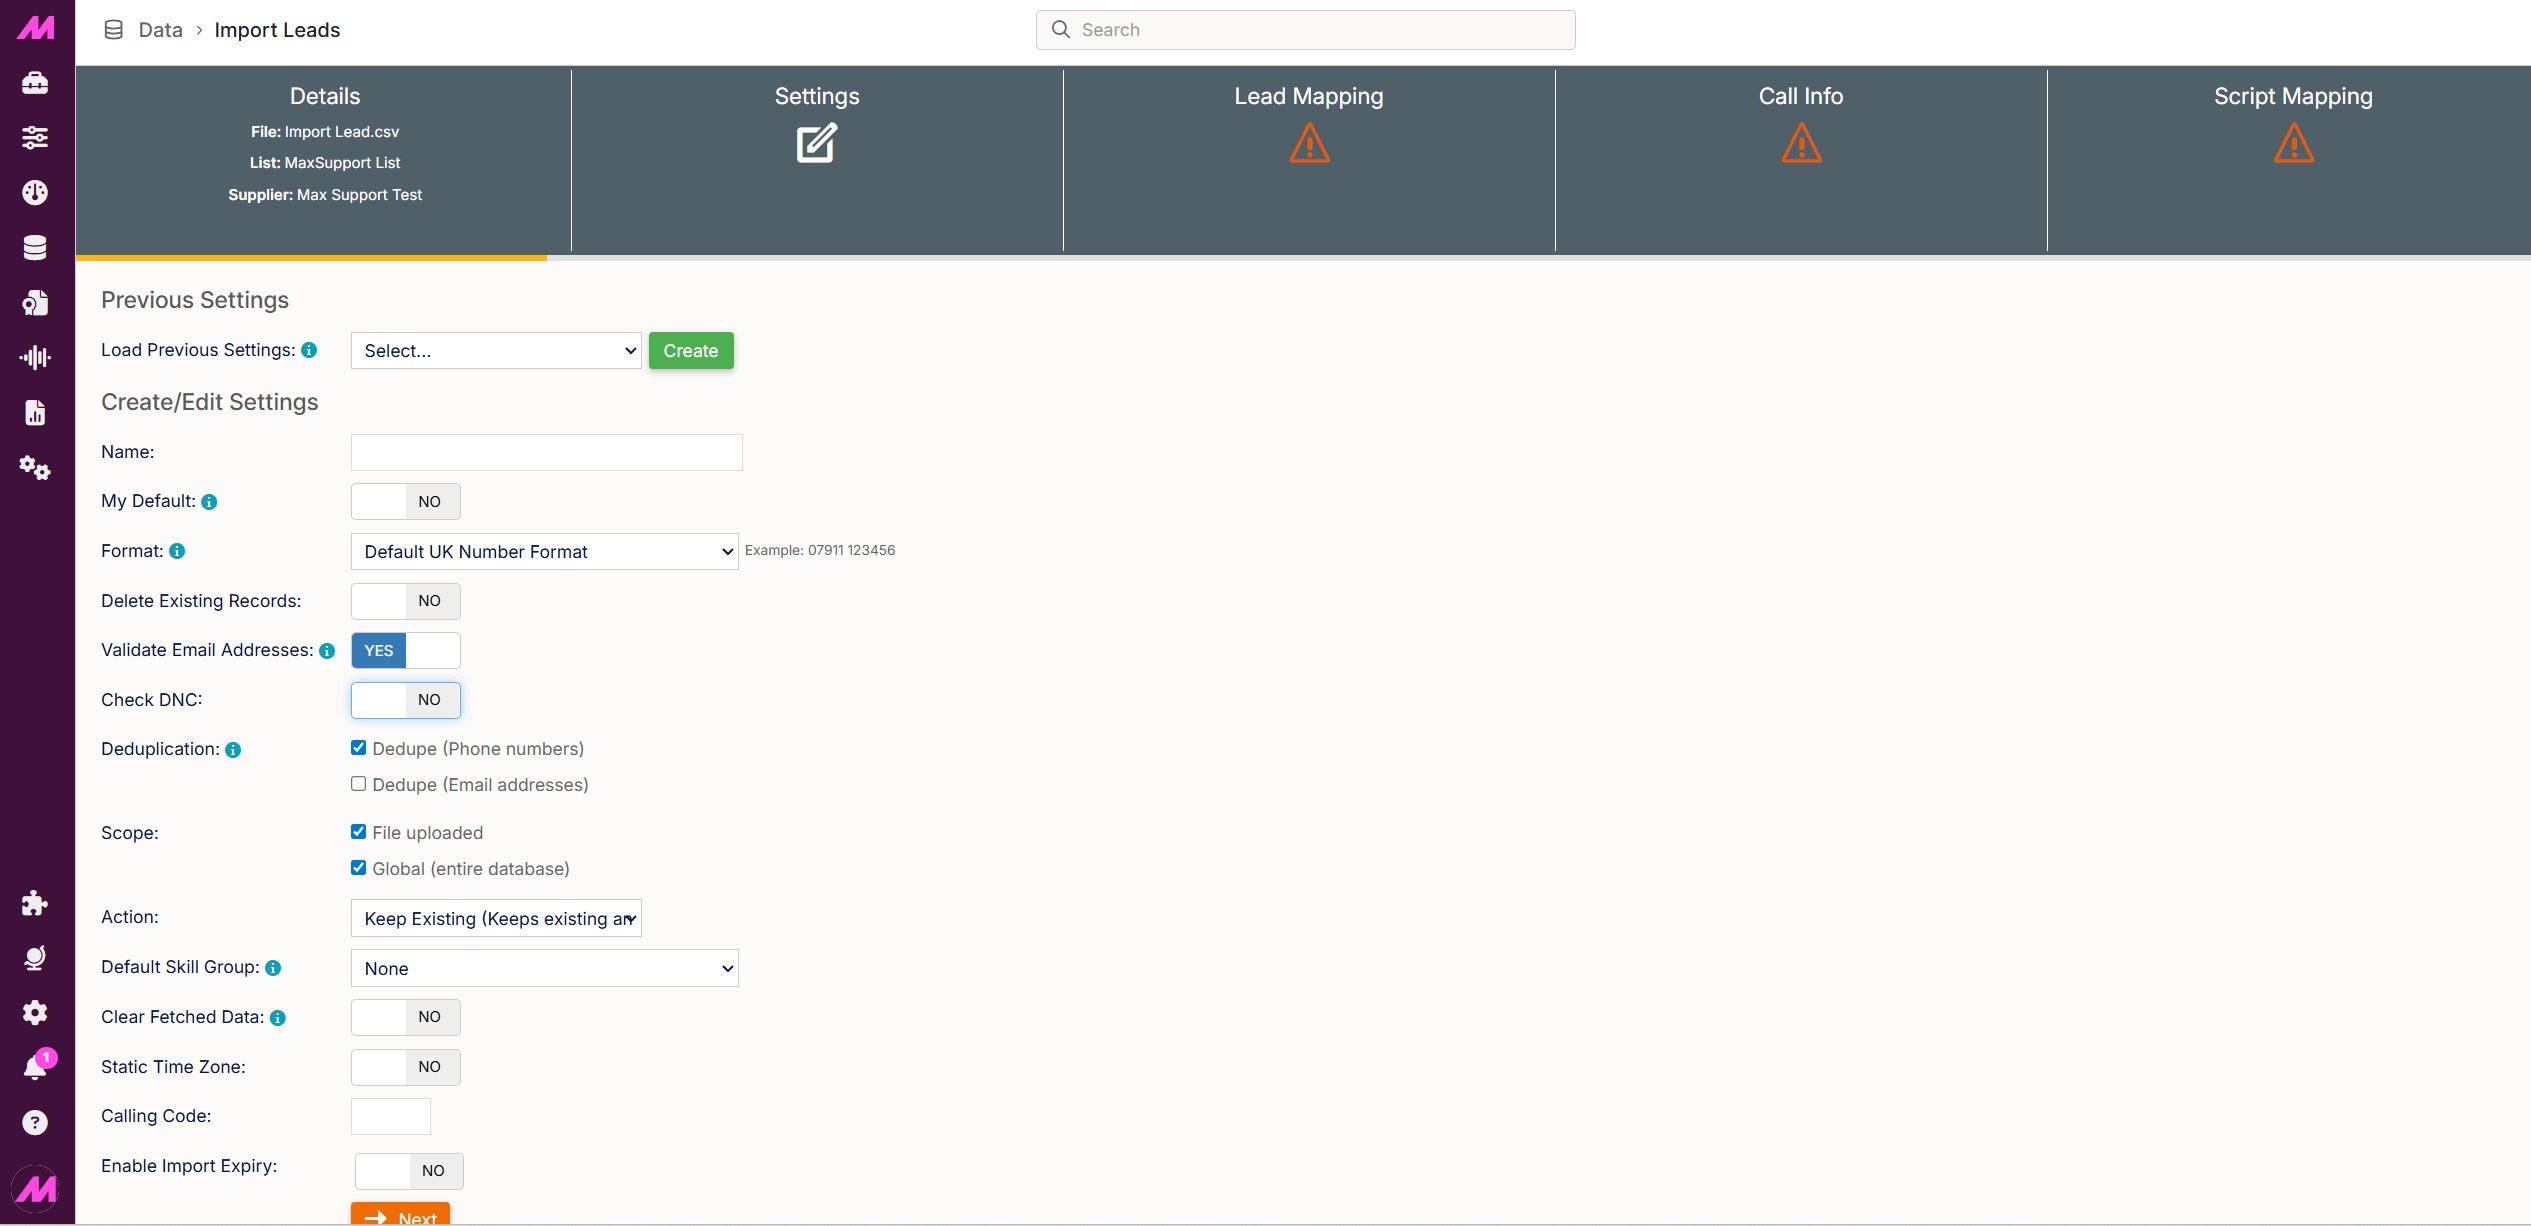
Stage 2: Settings
The Settings stage gives you control over how the data is validated and processed on import — including DNC checking, deduplication, number formatting, and expiry.
Previous settings
| Field | Description |
|---|---|
| Load previous settings | If Ad-hoc was unticked on the previous stage, any settings you've used before are saved and available here. Selecting a saved setting automatically populates all the fields on this page. |
Create / edit settings
| Field | Description |
|---|---|
| Name | Only visible when Ad-hoc is unticked. Name this settings configuration so it can be identified and reused in future imports. |
| My default | Only visible when Ad-hoc is unticked. Set to Yes to make this your default settings profile — it will be automatically selected at the start of each future import. |
| Format | Controls how phone numbers are formatted on import. Four default options are available: Default UK — adds a leading 0 to numbers International UK — adds 0044 prefix International AUS — adds 0061 prefix International SA — adds 0027 prefix For other international formats, select Advanced — this gives you manual control over leading zeros, non-digit removal, minimum/maximum number length, and digit truncation. |
| Delete existing records | Applies to the destination list only. Yes: deletes all existing records on the list before importing. No: keeps existing records and adds to them. If set to Yes, a second toggle appears: choose whether leads with callbacks should be kept or removed. Yes: existing leads and callbacks remain unaffected. No: existing leads and callbacks are deleted, and the new lead is imported in their place. |
| Validate email addresses | When set to Yes, any lead with an invalid email address will be rejected on import. Set to No if you are only using the system for voice, otherwise leads with valid phone numbers but invalid emails will be rejected unnecessarily. |
| Check DNC | When enabled, the system checks your import file against your DNC categories. Any number matching a DNC entry will not be imported. Select which DNC categories to check against by ticking them. By default, three lists are available: IVR, Imported, and Requested. Additional custom categories you've created will also appear here. |
| Deduplication | Checks for duplicate records and performs an action based on your selection. You can check for duplicate phone numbers, email addresses, or both. Once enabled, you must also set a Scope and Action (see below). |
| Scope | Defines where the system looks for duplicates: File uploaded — checks for duplicates within the CSV file only Global (entire database) — checks the CSV against all records across the entire system Dedupe against the destination list — checks the CSV against records on the destination list only Dedupe against additional lists — lets you select specific lists to check against Options 3 and 4 can be combined. Options 3 and 4 are unavailable if Global is selected. |
| Action | Determines what happens when a duplicate is found: Keep existing — the existing lead stays; the duplicate from the import file is rejected Keep new — the newly imported lead replaces the existing one Reset older — the existing lead's call attempts are reset rather than replaced |
| Default Skill Group | This setting will only display if your system has Outbound Skill-Based Routing enabled. Allows you to set a default Outbound Skill Group to the imported leads. Useful if some or all of the leads in your import file have no Skill Group specified. Opt for 'None' if you are assigning Skill Groups directly in your import file. For more information on Outbound Skill, check out the following articles |
| Clear Fetched Data | Flushes campaigns, clearing any leads sitting in the dialler buffer waiting to be called. Use this alongside deduplication to prevent the same contact being called twice — once from the buffer and once from the newly imported record. Example: A lead is in the buffer about to be dialled. You import the same lead with updated details. Without flushing, both versions could be called. With flushing enabled, the buffered version is removed before the new one is imported. |
| Static time zone | Set to Yes to tag this import with a specific time zone, ensuring leads are only called at appropriate local times. Set to No to apply no time zone restriction. |
| Define time zone | Only visible when Static time zone is set to Yes. Select the time zone that applies to the leads being imported. Most UK customers will select London. For international data, select the relevant time zone for the target country. |
| Calling code | Adds a calling code prefix to numbers where required. For UK numbers, entering a single 0 will prepend it to all numbers on import. Note: the default Format options add this automatically, so this is only needed for custom setups. |
| Enable import expiry | When enabled, sets an expiry date on the imported data. At midnight on the expiry date, all leads from this import — along with any associated callbacks — are automatically removed from the system. Example: A BPO running a short-term promotional campaign imports data onto a specific list and sets the expiry date to the last day of the promotion. After that date, the leads are automatically removed without manual cleanup. |
| Expire option | Choose between Expire on a specific date or Expire in a number of days from the import date. |
| Expire on date | Set the specific date the data will expire (at midnight). Only visible when Expire option is set to a specific date. |
| Expire in days | Set the number of days from the import date after which the data will expire. Only visible when Expire option is set to a number of days. |
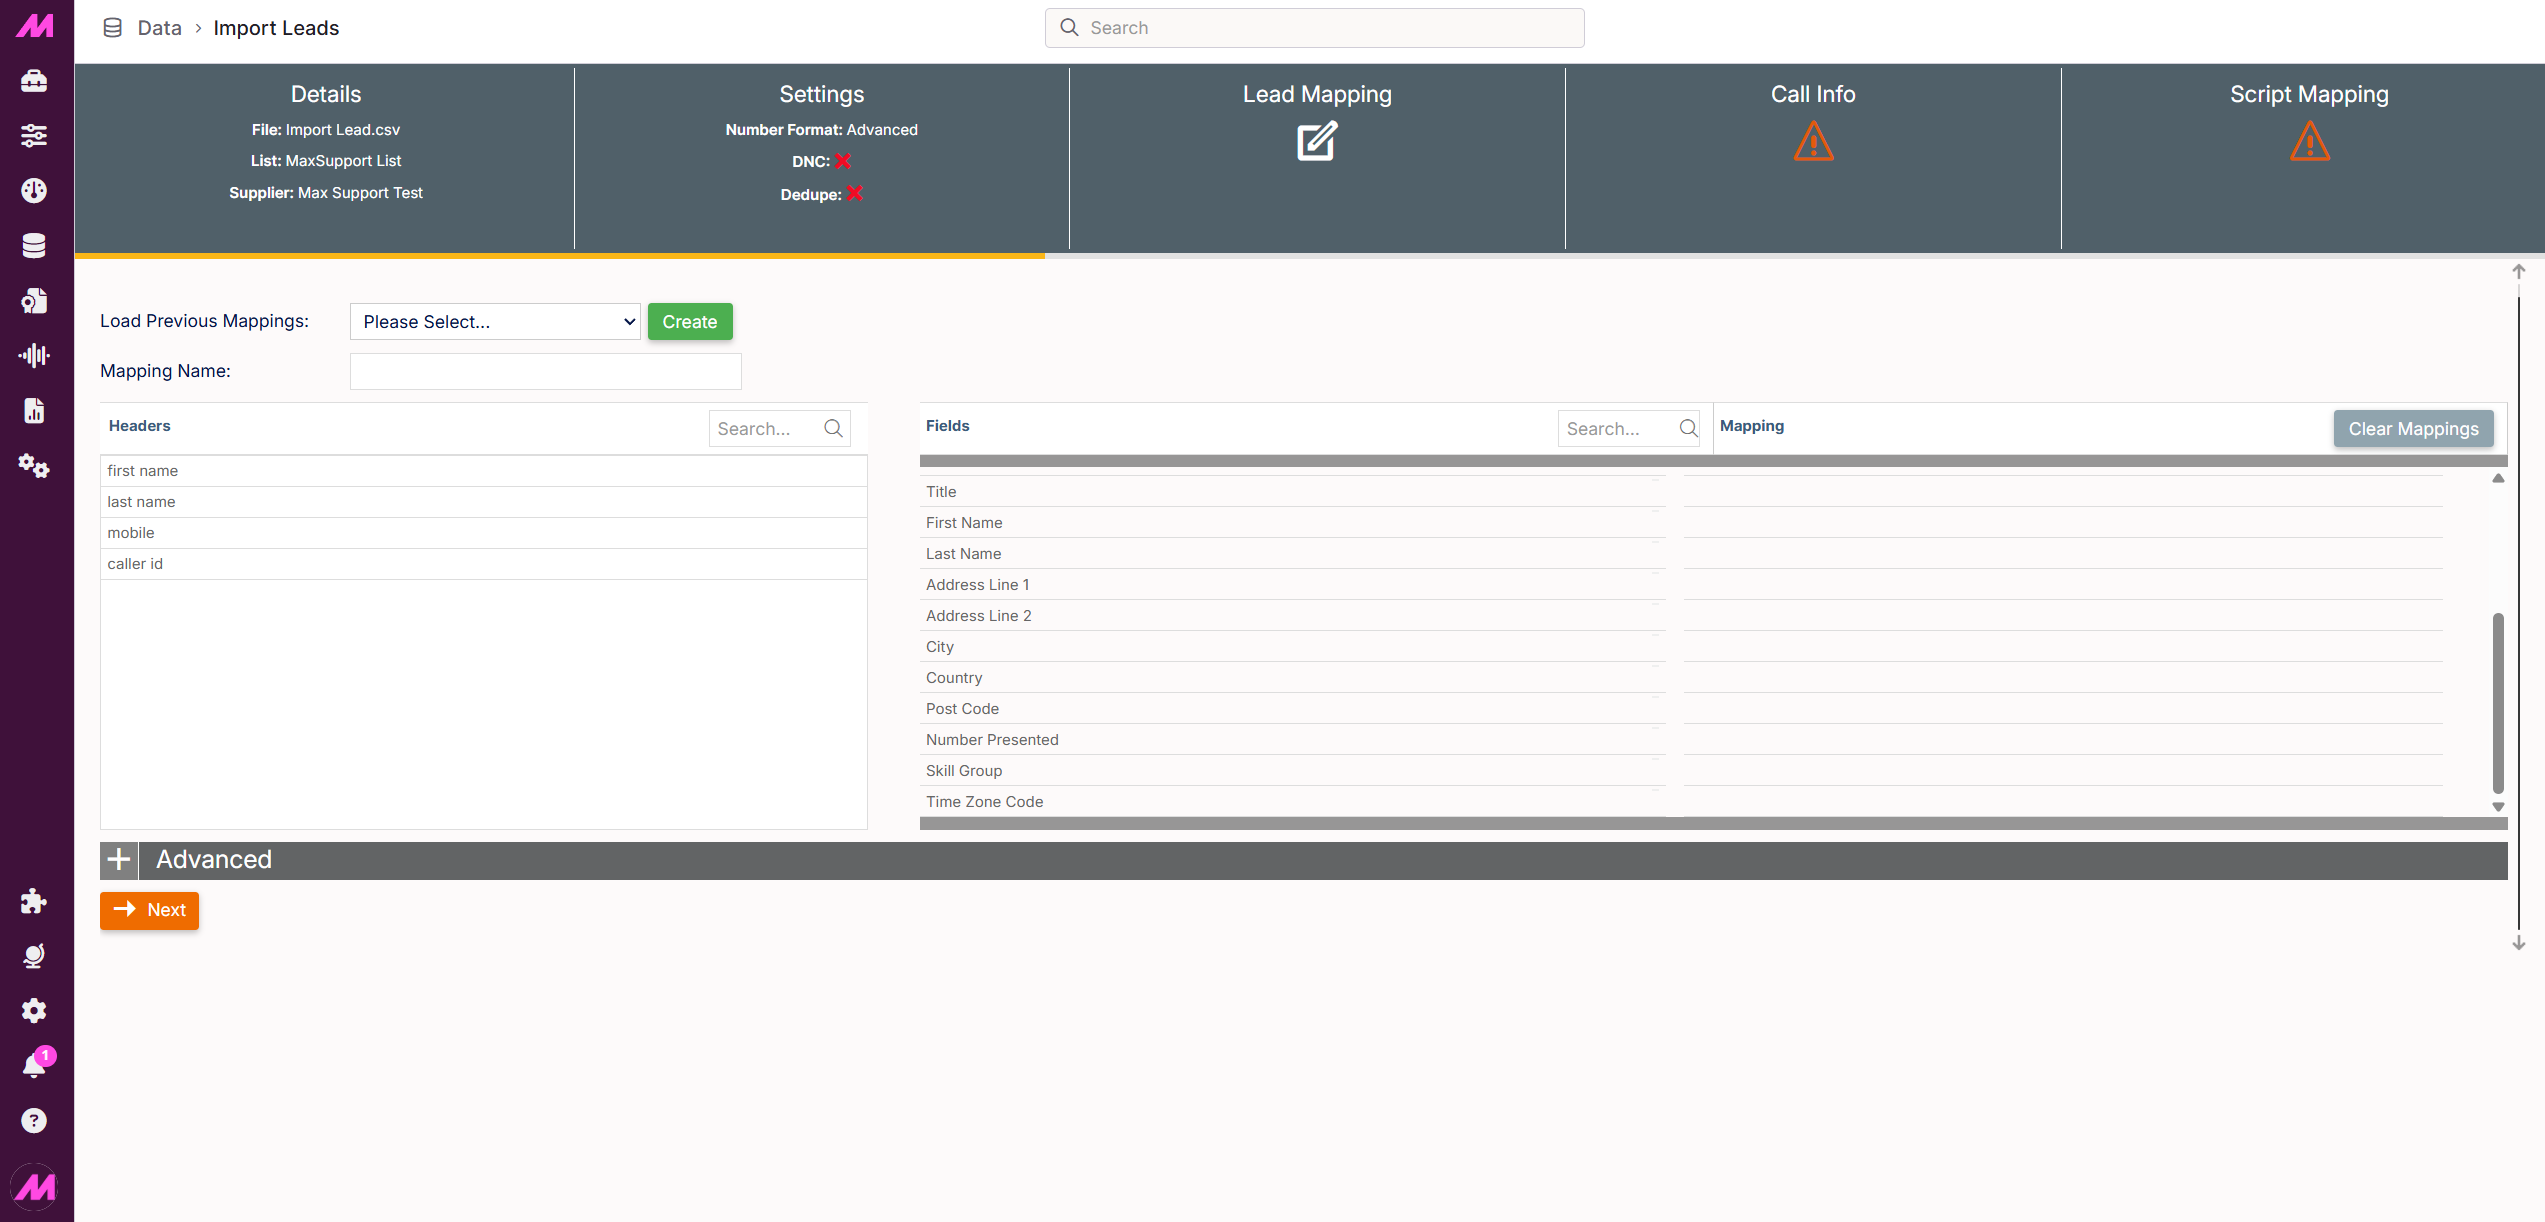
Stage 3: Lead Mapping
Lead mapping connects your CSV column headers to the standard fields in the MaxContact lead database. This controls how your data is stored and where it can be used across the platform.
Mapped data can be used for:
- Displaying contact information to agents on scripts and in Contact Hub during a call
- Filtering leads via Custom Data Fetching (CDF) in campaigns
- Moving or managing leads using List Data Manager
- Building custom reports based on your data
Previous mappings
| Field | Description |
|---|---|
| Load previous mappings | Loads a previously saved mapping configuration, automatically populating the mapping fields. Only available when Ad-hoc is unticked. |
| Mapping name | Name for a new mapping, or rename an existing one. |
Mapping columns
The mapping screen has three columns. To map your data, drag a header from the Headers column and drop it onto the corresponding field in the Fields column.
| Column | Description |
|---|---|
| Headers | The column headers from your CSV file. Drag these across to match them to the fields on the right. |
| Fields | The default fields in the MaxContact lead table. These cannot be changed. As a minimum, you must map at least one phone number or email address to proceed. |
| Mapping | Displays your mapped headers once they have been dragged into position. |

Advanced options
The Advanced section lets you use separator characters to combine multiple CSV headers into a single field. For example, if your data has Address Line 1, Address Line 2, and Address Line 3 as separate headers but you want to store them in one field, you can use a comma or custom character as a separator. Without a separator, values will be concatenated directly.
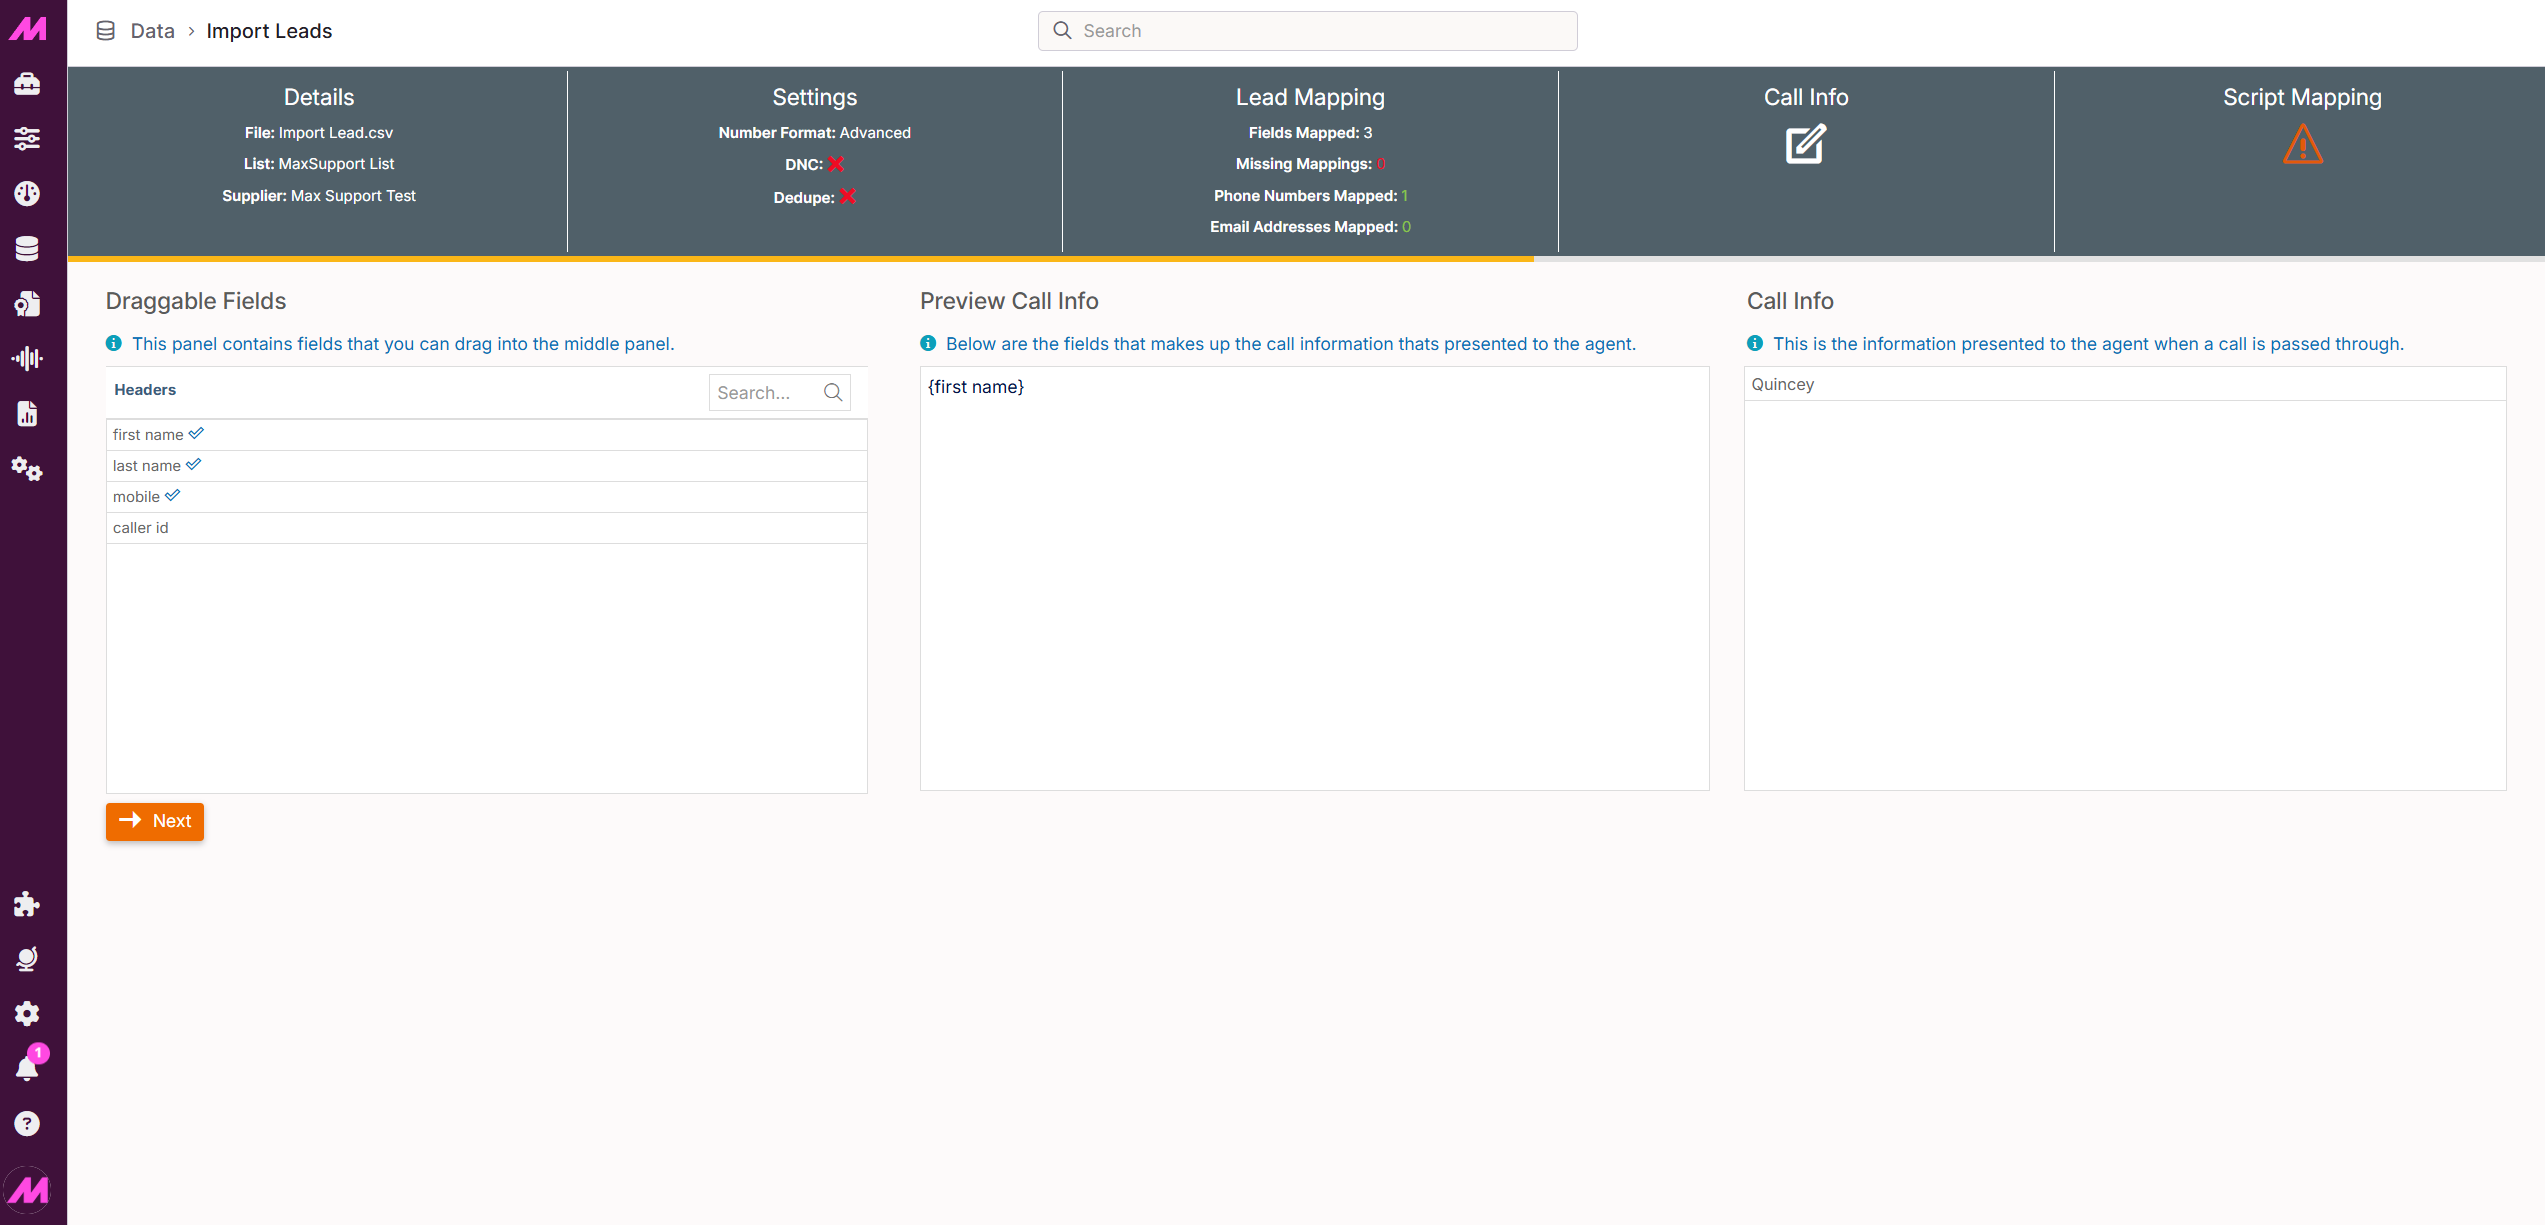
Stage 4: Call info
Call info lets you configure what agents see in the right-hand panel of Contact Hub when they are on a call. This is useful for surfacing key information — such as account details or current contract — without requiring agents to scroll through a script.
| Section | Description |
|---|---|
| Draggable fields | Contains your CSV column headers. Drag these into the Preview call info box to include them in the agent display. |
| Preview call info | Build the layout agents will see. Type labels directly (e.g. Name —, Reference —) and drag headers in to display the corresponding data values. Dragged headers appear in curly brackets { }. Where two headers appear on the same line, separate them with a space or punctuation for readability. You can also include data here that hasn't been mapped in the Lead Mapping stage. |
| Call info | Shows a live preview using the first five records from your CSV, so you can see exactly how the information will display to agents in Contact Hub before completing the import. |
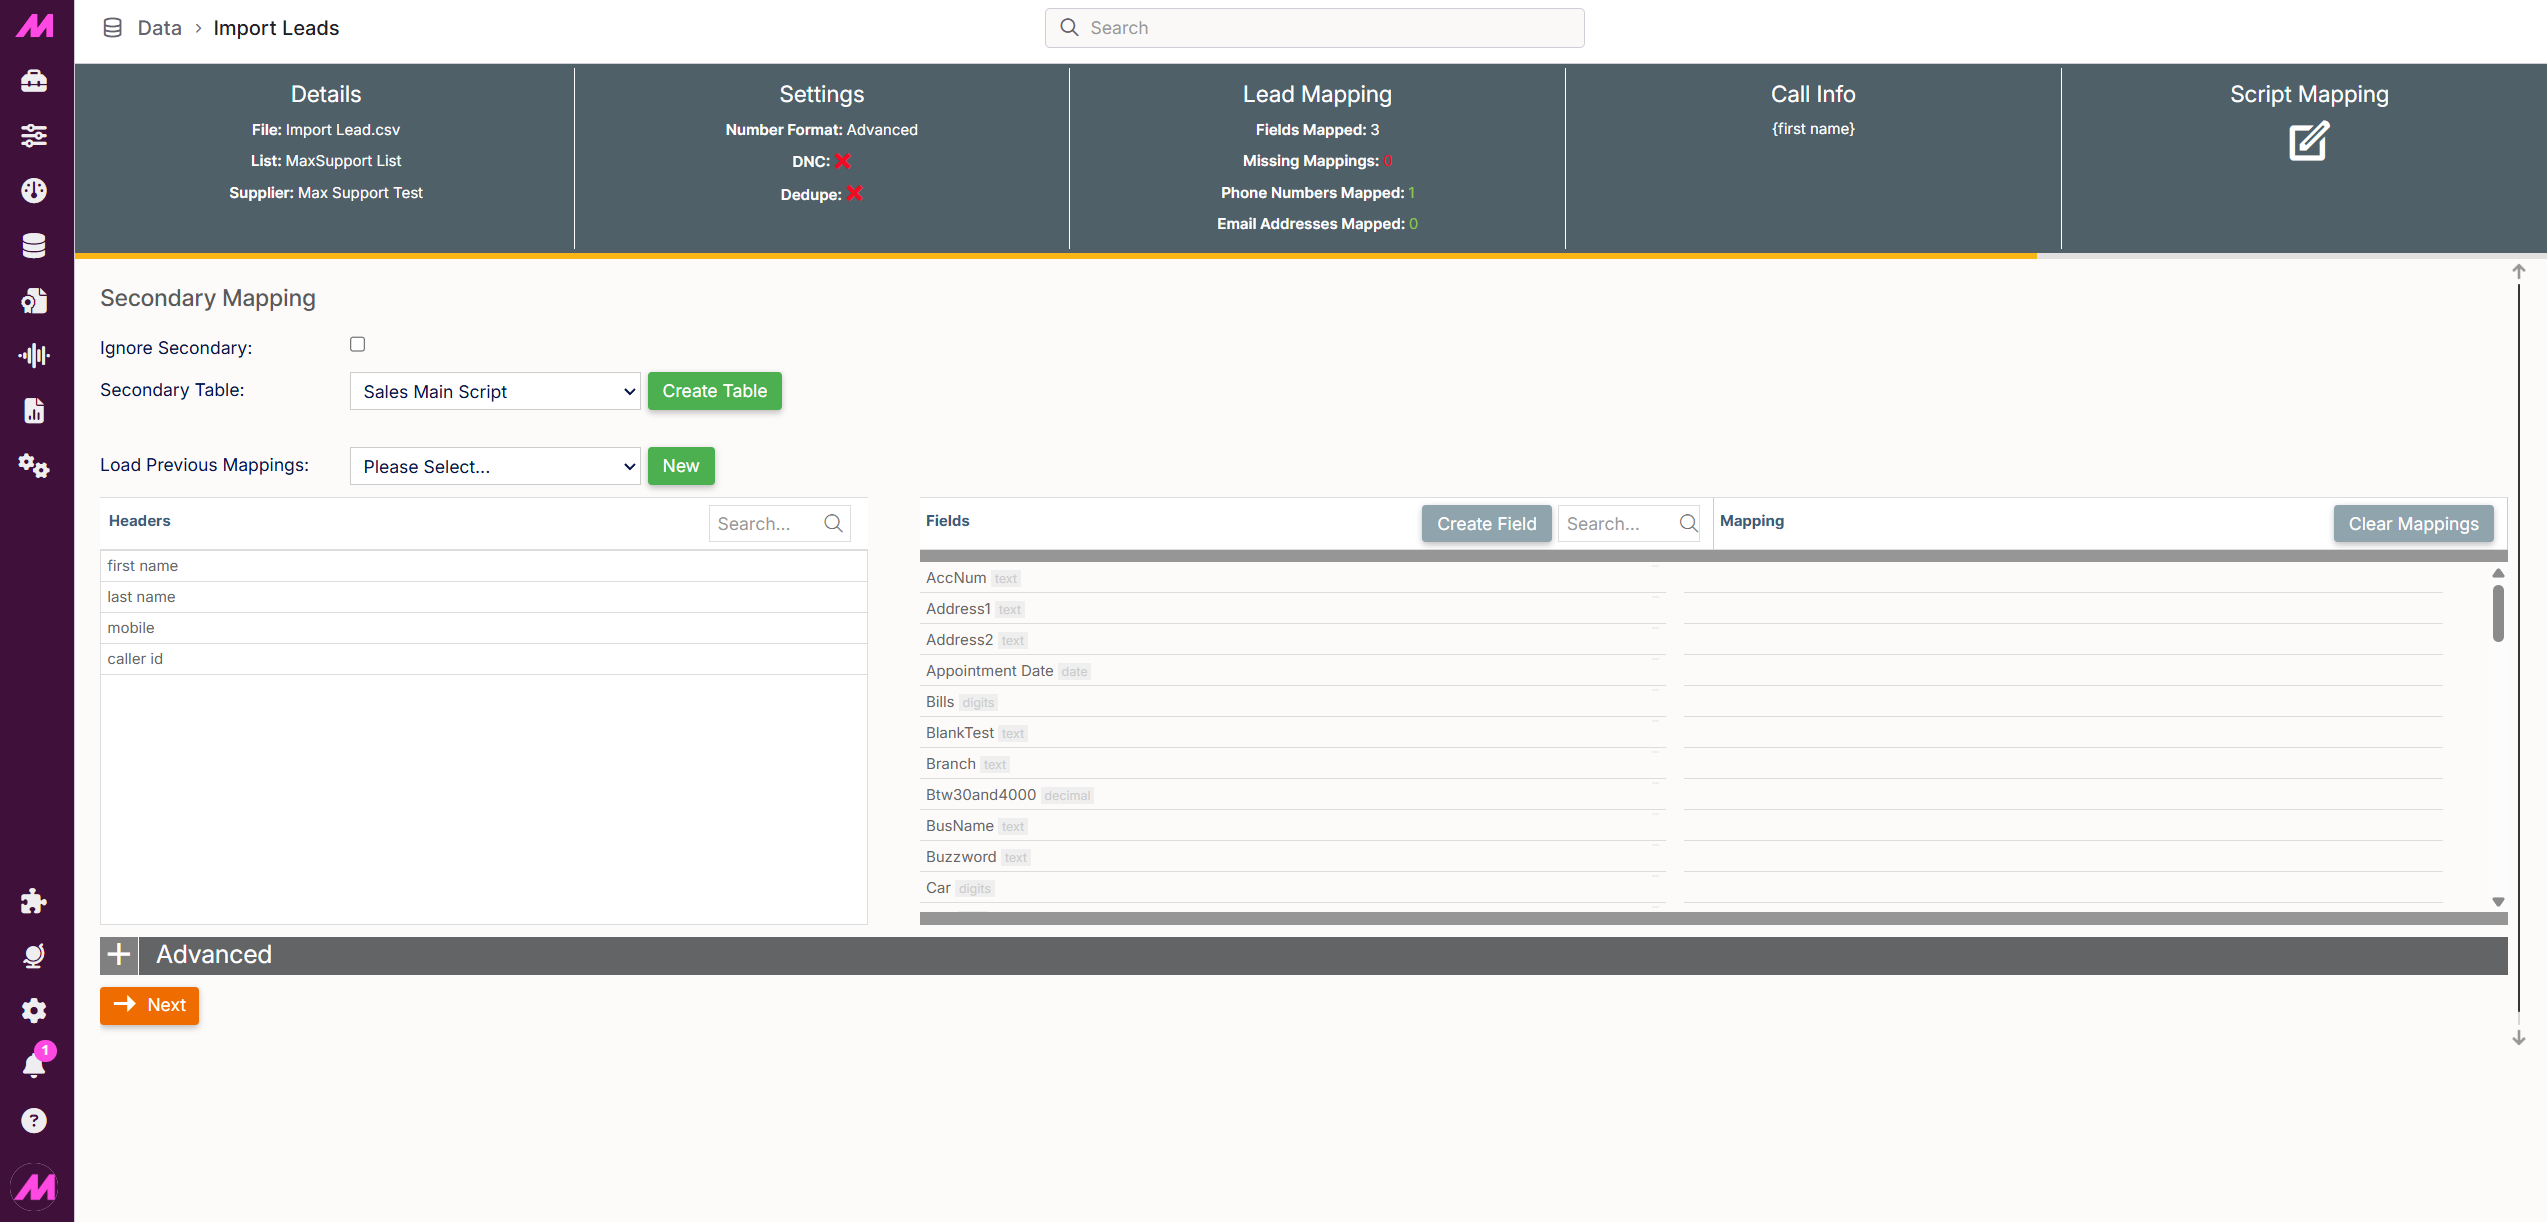
Stage 5: Secondary / Script Mapping
Secondary mapping allows you to map additional data from your CSV to a custom contact data table. This is separate from the default lead mapping table and gives you more flexibility for how data is stored, displayed, and used across the platform.
Mapped secondary data can be used for:
- Displaying additional fields on agent scripts
- Building custom reports with rules applied to this data
- Using List Data Manager to move, deactivate, or reactivate leads based on this data
- Filtering leads in campaigns via Custom Data Fetching (CDF)
Note. You must have a contact data table set up before using this stage. You can create one via Settings > Contact Data Tables or directly from this page using the Create table button. Your engineer will usually create an initial table during onboarding.
Select your data table from the dropdown. Once selected, the mapping screen appears — similar in layout to the Lead Mapping stage. If custom fields have already been created for you, drag your CSV headers to the matching fields. Any previously saved mappings can be loaded from the Load previous mappings dropdown.
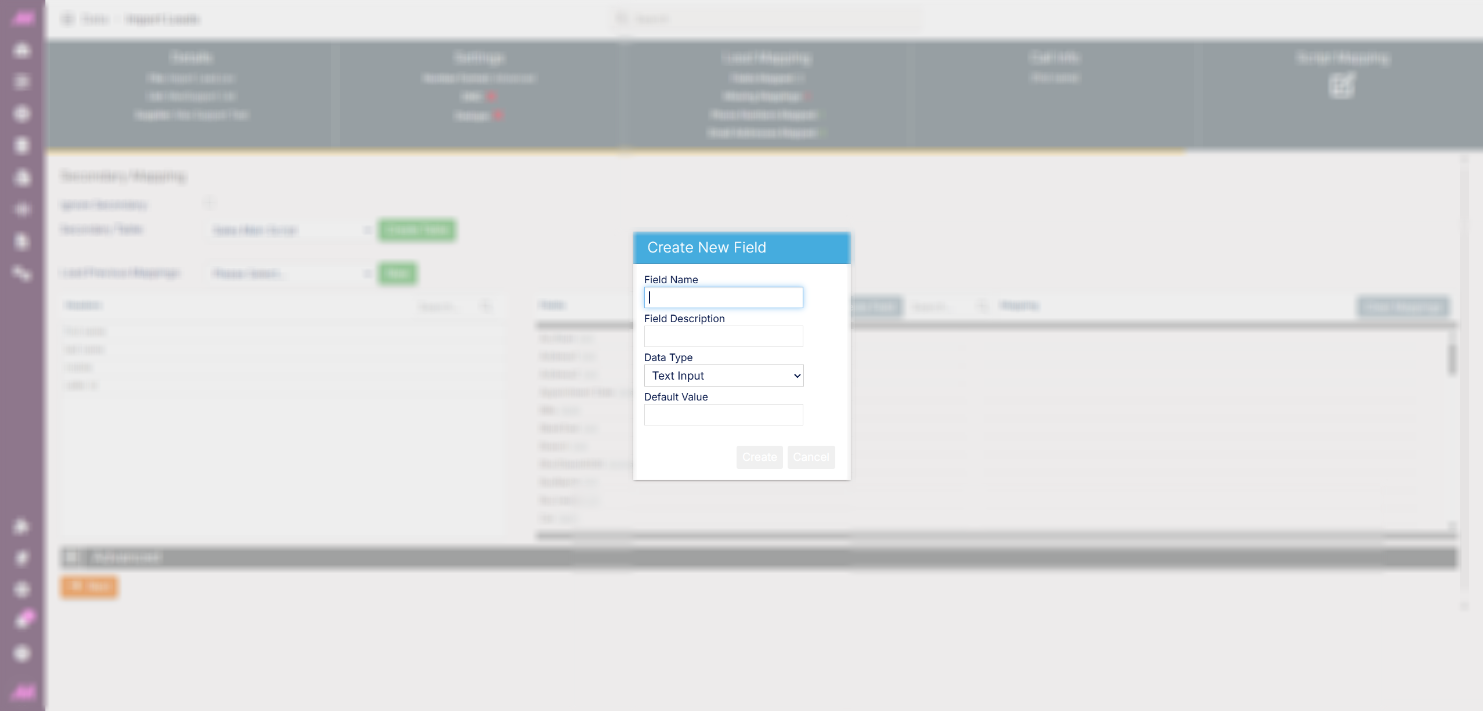
Creating a new field
If a field you need doesn't exist yet, click Create field to add one.
| Field | Description |
|---|---|
| Field name * | Name for the field. Naming it to match (or closely match) the corresponding CSV header avoids confusion later. Required. |
| Field description | Optional description of what the field contains. |
| Data type * | Sets how the data is stored and used. Choosing the correct type is important — it directly affects how data can be filtered, reported on, and used in scripts. Options are: Text input — free text; displays on scripts and in reports but cannot be filtered by value range Whole number — integers only Decimal number — numbers with decimal places Date only (dd/mm/yyyy) — required for filtering by dates such as contract end dates, renewal dates, or date of birth Time only (hh:mm) Date and time (dd/mm/yyyy hh:mm:ss) True or false — required for yes/no questions on scripts where the outcome determines the next step Phone number Required. |
| Default value | Optional. A fallback value displayed wherever this field has no data — for example, showing 'Unknown' in place of a missing supplier name. Most users leave this blank. |
* Required field
Once all data is mapped, click Next to proceed to the Summary.
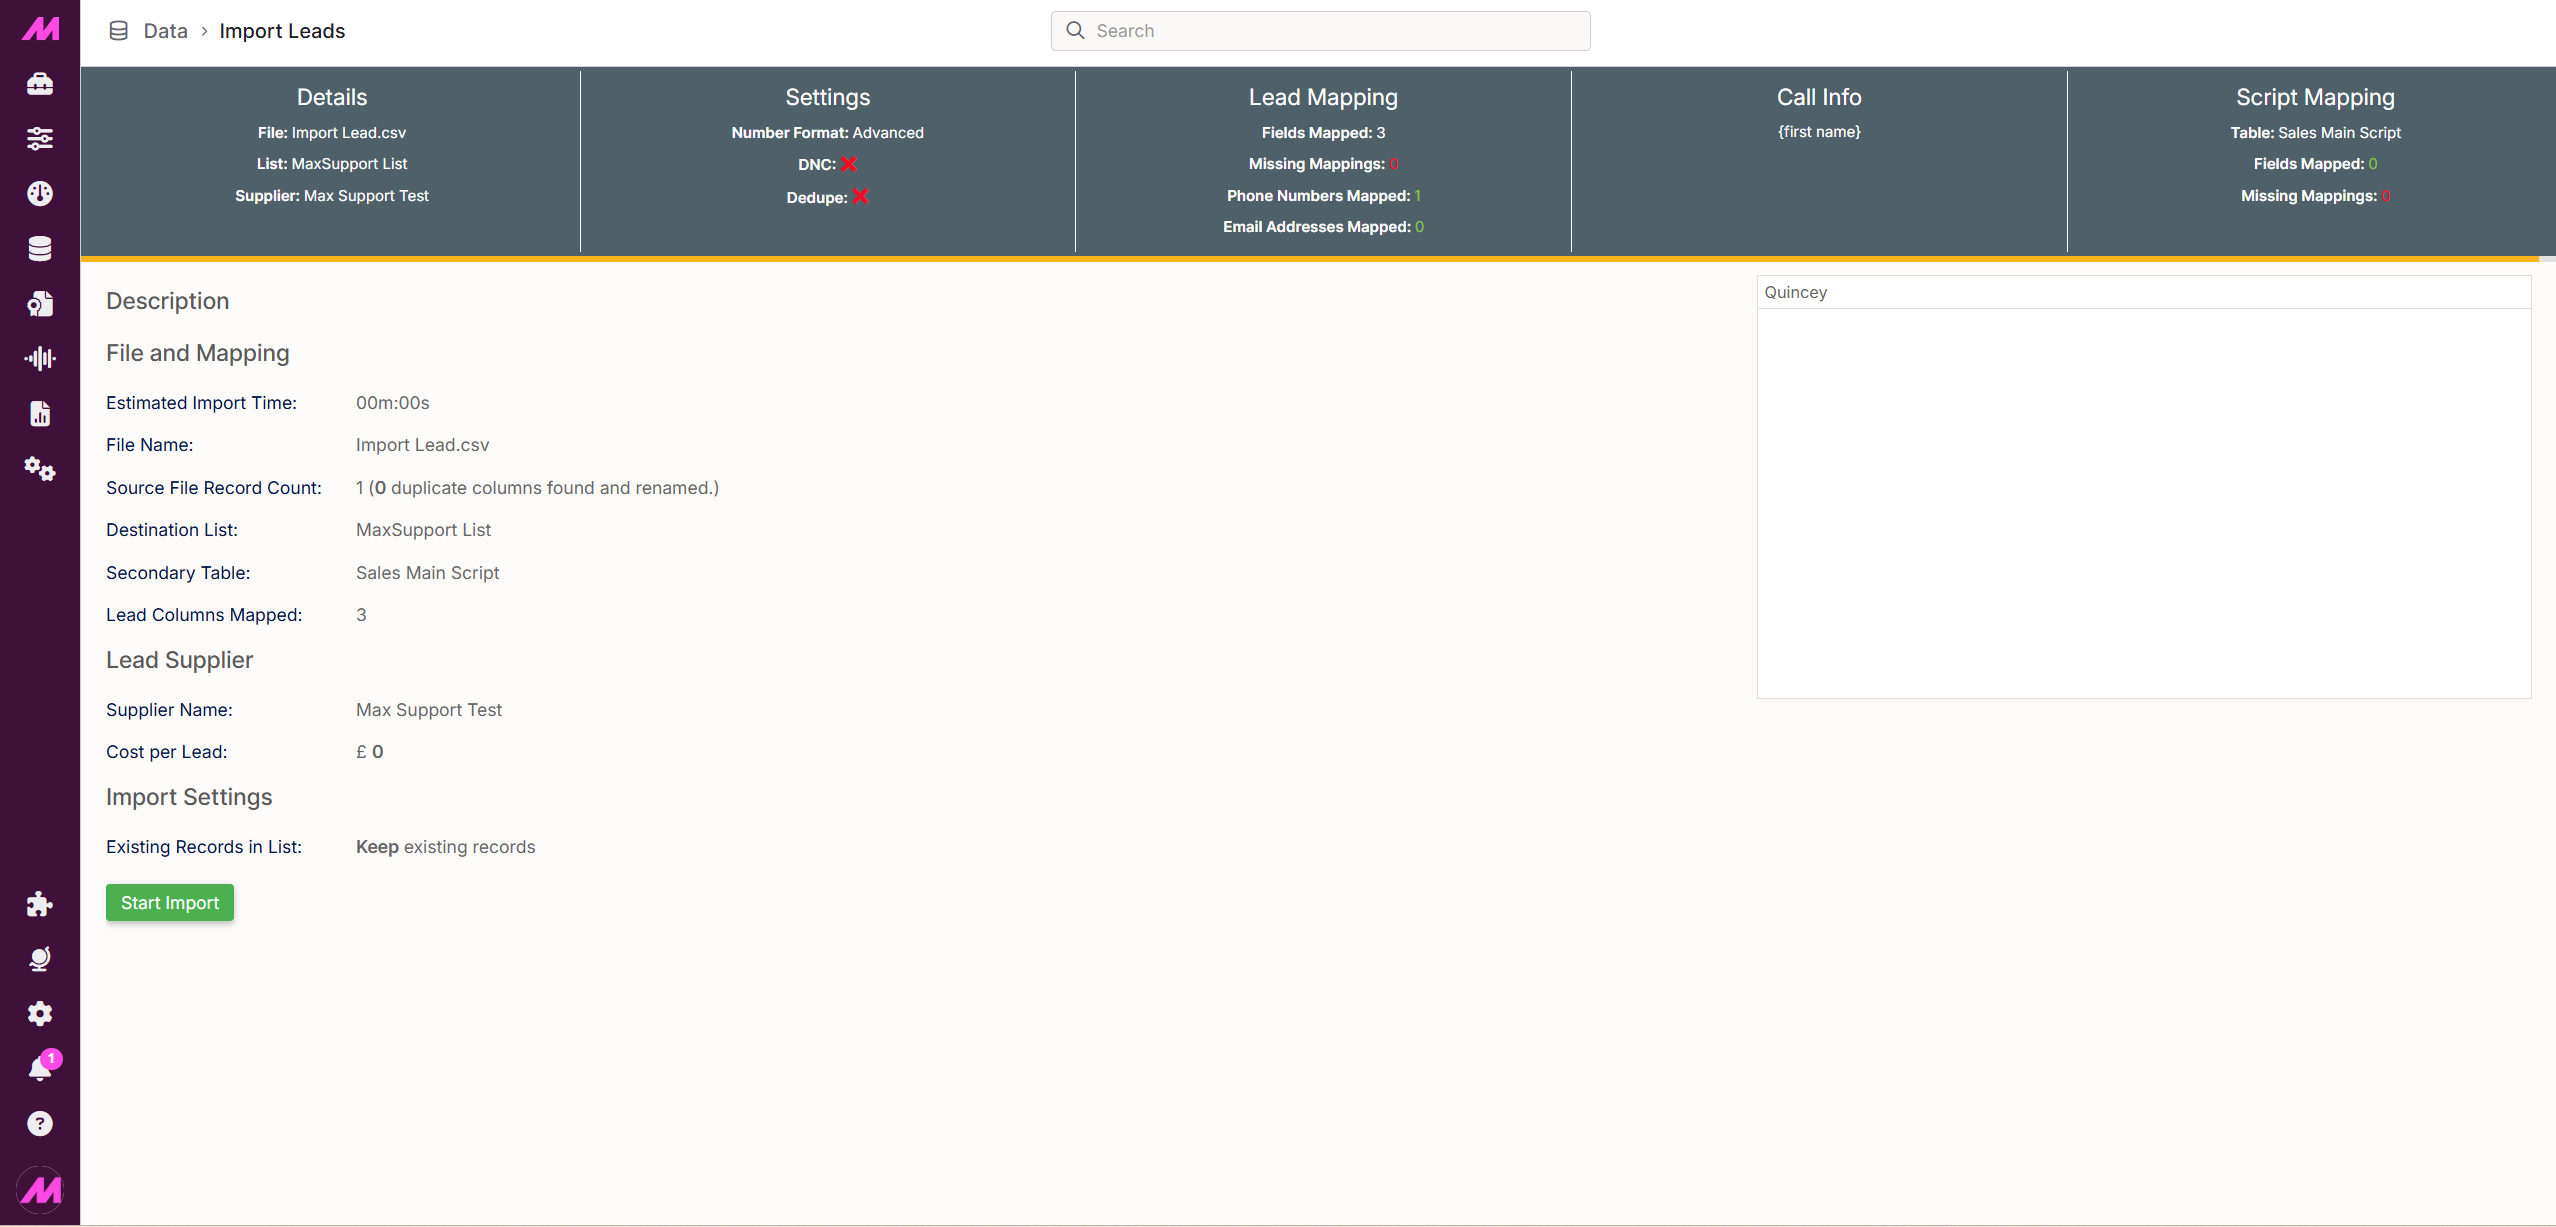
Summary
The Summary page shows a full overview of every setting and mapping selected throughout the import. Review this carefully before proceeding.
If anything needs changing, click the relevant stage name at the top of the screen to go back and make adjustments.
When you are satisfied everything is correct, click Start import. Once the import begins, two options appear: Do another import to start a new import, or Go to import history to view the status and details of this import.
For more on reviewing completed imports, see the Import Lead History article.