Campaign settings
Selecting a campaign in the table opens a pane on the right of the screen. This pane contains some settings that can be changed 'on the fly' from the page.

| Campaign dropdown | Allows you to change the state of the campaign between play and pause. This also allows you to stop a campaign entirely - if you have the correct permissions. |
 | |
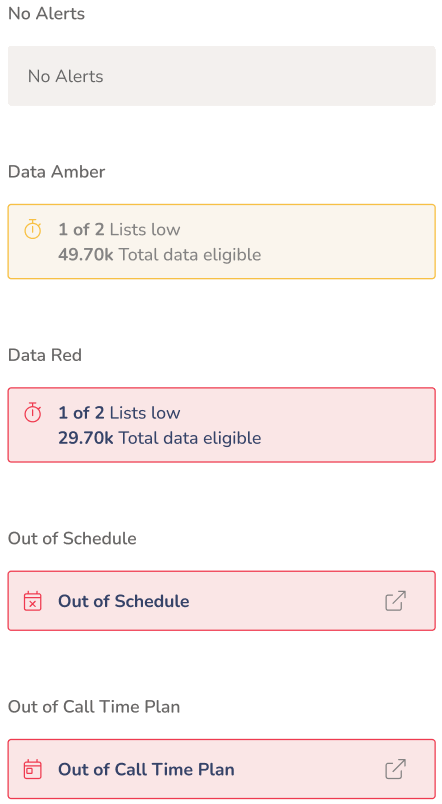
| Alerts | Will display any alerts that have been triggered and the information relating to the alert(s). This could include the number of lists low on data, the remaining list data, total data eligible for the campaign and the total filtered data eligible. When hovering over the alerts, you will see more information about the specific alert(s). |
 | |
| Campaign Settings | Allows you to control how the campaign operates. For non digital voice campaigns, you can change the type of outbound dialling between Predictive, Progressive and Preview. |
 | Predictive Choosing this option means the system will dial multiple leads for each user and distributes the answered calls to available users. Should there not be enough available users, calls will be dropped. You should ensure you have a minimum of 6 users for this type of campaign. This option allows you to set the following; Drop rate target. Once set, the platform will compare the Drop Rate Target against the actual Drop Rate and adjust its dialling speed accordingly. If the current Drop Rate exceeds the Drop Rate Target the campaign will slow down the number of outbound calls being made in an attempt to be at or under the set Drop Rate Target. You can set this between 0% and 100%. Access to this feature is based on the permission 'Drop Rate Settings'. Undroppable Toggle to enable/disable the undroppable algorithm. Enabling will initiate an alternative dialling algorithm to keep the Drop Rate % as close to 0 as possible whilst still dialling predictively. Please note, when enabling this the Drop Rate Target % is bypassed. |
 | Progressive Choosing this option means the system will dial one lead per user but also allow inbound calls to come in. This option allows you to set the following; Drop rate target. Once set, the platform will compare the Drop Rate Target against the actual Drop Rate and adjust its dialling speed accordingly. If the current Drop Rate exceeds the Drop Rate Target the campaign will slow down the number of outbound calls being made in an attempt to be at or under the set Drop Rate Target. You can set this between 0% and 100%. Generally you should not get dropped calls with a Progressive campaign but the option to set the drop rate target is there for the rare chance you do.Access to this feature is based on the permission 'Drop Rate Settings'. |
 | Preview Choosing this option means the campaign will dial in preview mode, meaning that it will give the users a set period of time to preview the lead before the system dials. No other settings are available for this mode. |
| For other non digital campaigns, you can change the following; | |
 | Inbound There are no options available for an Inbound campaign on this page. If you want to change the campaigns setup, you must do this from the CTU page. |
 | Bridge The only option available for Bridge campaigns is to choose how many lines to use when transfers are made over the Bridge campaign, handy if you want to limit the number of concurrent transfers. Don't forget this is the maximum and other factors will influence the number of lines in use. Max Lines: You can set this between 0 and 999 Lines. |
 | Digital There are no options available for a Digital campaign on this page. A digital campaign can only be modified in the CTU page. |
| Other Settings | |
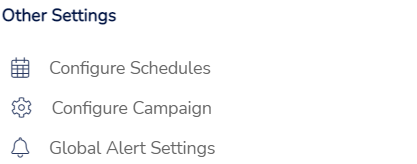
 | These are simply shortcuts to relevant pages within the product. Configure schedules Configure campaign Global alert settings |
| Alert Settings | Toggle to enable/disable alerts for this Campaign. When enabled, Low Data alerts will be shown on the Campaign Manager page and also sent via email Please note, if Global Settings is selected and global alerts within the Settings page are disabled then this toggle will have no effect. You cannot set alerts on Digital campaigns. |
  | |
| Alert Settings Source | Select the source for the alert settings. |
 | Alert Settings Source: The global settings shortcut takes you to the settings page where you can edit the alert. If you select 'Campaign settings', the settings below will need to be entered. |
 | Emails: The email address entered here will receive the alert email when triggered. |
 | Low Data: Enter at what level of data you want alerts to be triggered. Don't forget, alerts automatically stop if more data is made available and will stop based on the number of Max Alerts set. Each email sent will reflect an updated time estimate before the data will run out. |
 | Interval: Enter how often email alerts will be sent when the Low Data threshold is met. |
 | Max Alerts: Enter the maximum number of alerts you want to send before these stop. Don't forget, alerts will automatically stop if more data is made available. |
 | Toggle to enable/disable alerts on all lists that are currently assigned to this campaign. |
| Other settings | These are simply shortcuts to relevant pages within the product. Configure schedules Configure campaign Global alert settings |
 | |
| Eligibility View | |
 | Leads Eligible: Total amount of eligible data to be dialled |
| Leads Eligible Filtered: Total amount of eligible data based on the Custom Data Fetching Plan applied | |
| Leads Eligible Skilled: Total amount of data that qualifies for dialling, considering both the skills of the users currently logged in and the data available for dialling. Find out more about Outbound Skill-Based Routing. | |
| Skill Group Lead Distribution: A breakdown of data eligible for dialling, grouped by Skill Group with the corresponding users logged in. Don't forget, if you disable Skill-based Routing, the below will continue to show the volumes of data that have each Skill Group assigned (you just won't see Users anymore). | |

List settings
Selecting a list in the table opens a pane on the right of the screen. This pane contains some settings that can be changed 'on the fly' from the page.
| Alerts | Will display any alerts that have been triggered and the information relating to the alert(s). This could include the number of lists low on data, the remaining list data, total data eligible for the campaign and the total filtered data eligible. When hovering over the alerts, you will see more information about the specific alert(s). |
 | |
| List Settings | |
 | Select which dialling mode you want this list to follow when it is added to a campaign. If you select 'Follow Campaign Type' the data in this list will be dialled the same as the campaign e.g. predictive, progressive, preview. If you select 'Preview' all data in this list will be dialled in preview no matter how the campaign is set up. |
 | The fetch weight is a simple sliding scale, the higher the number, the more calls will be fetched from this list compared to other lists with a lower number. Whilst the fetch weight can be set here, it can also be updated as and when needed within the Campaign Manager screen. If 2 or more lists are set to the same figure, the platform will fetch from each of them equally. |
 | Select a Custom Data Fetching plan for this list, if required. This will control which data is called from the list. You can customise the priority of your data with separate queries within these plans. The shortcut will take you to the Plan page where you can configure CDF.Access to this option is controlled by the 'Can Access Custom Data Fetching' permission.  |
Other Settings (List) | These are simply shortcuts to relevant pages within the product. Record History Configure Plans Configure Result Codes Configure Schedules Configure this List |