 | TABLE OF CONTENTS |
Settings

Fig.1 - The IVR page settings
At the top of the IVR Editor page, you can select from the following options;
 | Clicking here will create a new IVR page. |
 | Clicking here will allow you to clone the IVR page. |
| Page list | Here you can select the IVR page you want to view/edit. |
 | Clicking here allows you to edit the IVR name. |
 | Saves any changes. |
Within the 'IVR Pane' in the centre of the screen, you can use the following options;
 | Colour Paths - Allows you to change colours of the links between elements. |
 | Filter Paths - Allows you to filter the view to show certain paths. |
 | Auto Fit |
 | Zoom In |
 | Zoom Out |
 | Undo |
 | Redo |
Placing Elements
When selecting elements, all you need to do is click and drag the required element from the left hand menu onto the white space of the page.

Fig.2 - A start element dragged into the page.
Once the required element has been placed, the 'Properties' pane on the right hand side of the screen will be populated wilt the options available for that particular element.
Connecting Elements
When connecting elements, all you need to do is select and drag from one joining tab to another. Once connected, the elements will stay joined even when moving round the screen.

Fig.3 - Connecting 2 elements
IVR Elements
Add to DNC
Primarily used on IVR (Message Blast) campaigns, the 'Add to DNC' element provides customers with the ability to add themselves to the do not call register.

I = Input
O = Output
E = Error
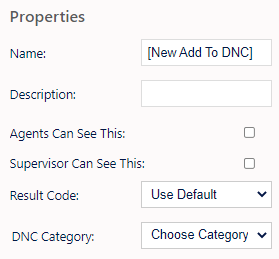
Name, Description - Add a name and a description for the element.
Agent Can See This - This means that if the inbound call comes through to an agent, they can select this to transfer the caller to this IVR element - where they can enter their mobile number to add it to the DNC list (Shows as workflow).
Supervisor Can See This - Anyone with the role type set as 'supervisor' within their main role, will be able to see the option but no-one else.
Result Code - You can assign a result code to the IVR element.
DNC Category - Here you can select a DNC category (DNC list to add the lead to) from the drop down.
Example
In the below example, when the customer connects, they are provided an option to press 1 to route to an agent or press 2 if they wish to remove themselves from the call list.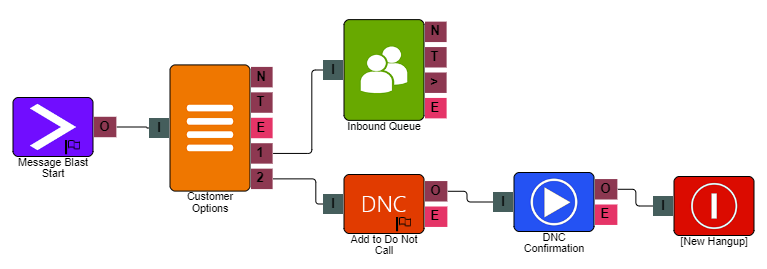
Camp Check
Allows the IVR to check a campaigns status and route the call accordingly.
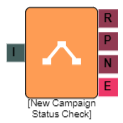
I = Input
R = Running
P = Paused
N = Not Running
E = Error
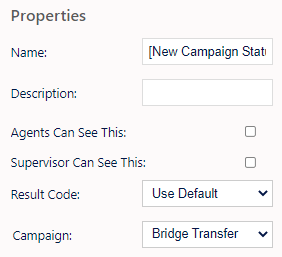
Name, Description - On each IVR element, you can add a name and a description of the element.
Agent Can See This - If this is checked, when an agent is on a call to a customer, they can select this element from the transfer drop-down under Workflow.
Supervisor Can See This - Anyone with the role type set as 'supervisor' within their main role, will be able to see the option but no-one else.
Result Code - You can assign a result code to the IVR element.
Campaign - You can select a campaign from the drop down list.
Capture Digits
The 'Capture Digits' element can be used to allow customers to input information such as reference numbers and phone numbers through their mobile keypad. The captured information can also be stored and referenced in other IVR elements to read back the entered digits.
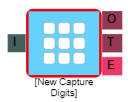
I = Input
O = Output
T = Timeout
E = Error
Name, Description - On each IVR element, you can add a name and a description of the element.
Agent Can See This - If this is checked, when an agent is on a call to a customer, they can select this element from the transfer drop-down under Workflow.
Supervisor Can See This - Anyone with the role type set as 'supervisor' within their main role, will be able to see the option but no-one else.
Result Code - You can assign a result code to the IVR element.
Clear Digits Buffer - Checking this will clear any previous digits pressed by the customer.
Min Digits (Len) - You can set a minimum digit length here.
Max Digits (Len) - You can set a maximum digit length here.
Retries - You can set a retry limit here.
Terminate Digit - Here, you can set the terminate digit - "When finished, press the # key."
Timeout (s) - You can set the length of time to timeout if there is no response from the customer. After this it will retry.
Digits Validation - Here, you can select from a drop down menu of default validation rules which tells the element what to check the customers details against (Phone Number UK should be 11 digits etc).
Command
The 'Command' element allows the system to perform certain actions within the IVR.
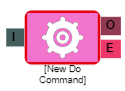
I = Input
O = Output
E = Error
Name, Description - On each IVR element, you can add a name and a description of the element.
Agent Can See This - If this is checked, when an agent is on a call to a customer, they can select this element from the transfer drop-down under Workflow.
Supervisor Can See This - Anyone with the role type set as 'supervisor' within their main role, will be able to see the option but no-one else.
Result Code - You can assign a result code to the IVR element.
Command - Here, you can select which command for the IVR element to perform.
Other Call Info Append - Adds the information as text to the end of 'call info' in Web Agent.
Other Call Info Prepend - Adds information as text to the beginning of 'call info' in Web Agent.
Other Call Info Modify - Changes the current 'call info' shown in Web Agent.
Update Call Property - Selecting this displays the following;
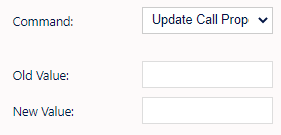
Old Value - Opens a drop down menu displaying the available fields to update.
New Value - Here you enter the value you wish to update the chosen field to.
Write To History - Splits the call in record history so there are 2 histories, one for each part of the call. For example, if an agent transfers a call to an IVR to pass to another department, you can have the original call and the transfer call as separate entries.
Add To Virtual Queue - Adds the call to the Virtual Queue.
Play Digits - This will play the customers phone number digits back to them, e.g. reading out their phone number one digit at a time.
Play Number - This will play a number back to the customer.
Play EQT - Selecting this will make the element play the Estimated Queue Time to the caller.
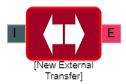
External Transfer
Allows the IVR to transfer calls to an external number.
I = Input
E = Error
Name, Description - On each IVR element, you can add a name and a description of the element.
Agent Can See This - If this is checked, when an agent is on a call to a customer, they can select this element from the transfer drop-down under Workflow.
Supervisor Can See This - Anyone with the role type set as 'supervisor' within their main role, will be able to see the option but no-one else.
Result Code - You can assign a result code to the IVR element.
Phrase - Clicking here allows you to access a screen where you can select or upload .wav files that will be played to the customer when being transferred.
Campaign - Here, you can select the campaign from the drop-down menu. This is the campaign that will handle the call. Note - Only Bridge campaigns will show.
List - You can select the list required here, this allows you to report on how many external transfers have happened.
Phone Number - Here, you can enter the number you wish to transfer the calls to.
Example
In the example below, the IVR is configured to transfer to an external number if a customer calls in outside of the opening hours configured for MaxContact users.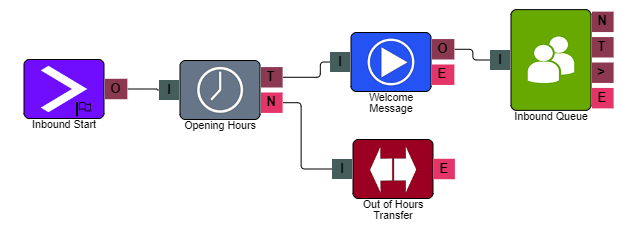
Hang-up
The IVR will hang up when the call gets to these elements present on the IVR.

I = Input
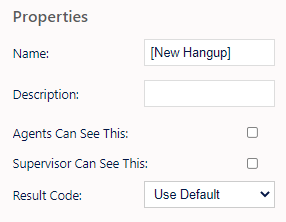
Name, Description - On each IVR element, you can add a name and a description of the element.
Agent Can See This - If this is checked, when an agent is on a call to a customer, they can select this element from the transfer drop-down under Workflow.
Supervisor Can See This - Anyone with the role type set as 'supervisor' within their main role, will be able to see the option but no-one else.
Result Code - You can assign a result code to the IVR element.
IVR Menu
Allows you to add routing options to your IVRs.
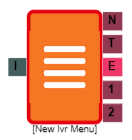
I = Input
N = No Match
T = Timeout
E = Error
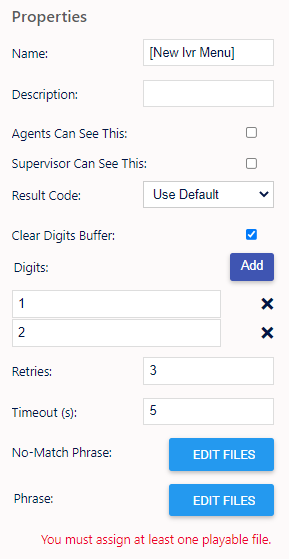
Name, Description - On each IVR element, you can add a name and a description of the element.
Agent Can See This - If this is checked, when an agent is on a call to a customer, they can select this element from the transfer drop-down under Workflow.
Supervisor Can See This - Anyone with the role type set as 'supervisor' within their main role, will be able to see the option but no-one else.
Result Code - You can assign a result code to the IVR element.
Clear Digits Buffer - Clicking here will clear all the digits selected on the IVR element (After they have been added).
Digits (Add)- Clicking here will add a digit for the customer to select e.g. 'Press 1 for sales'. You can add up to 10 digits ranging from 0 - 9. Digits can be edited by selecting them on the right (Limited to one character per digit). They can also be deleted by clicking the X next to them.
Retries - Here, you can set the amount of retries for playing the message on the IVR element
Timeout - Here, you can set the amount of time to give the customer to respond after the message has been played before it retries and plays the message again.
Phrase - Here, you can select the phrase to play to the customer for the IVR element.
Example
The example below simply provides the customer with the choice of routing to the sales, support or customer services queue by selecting1,2 or 3 on their keypad.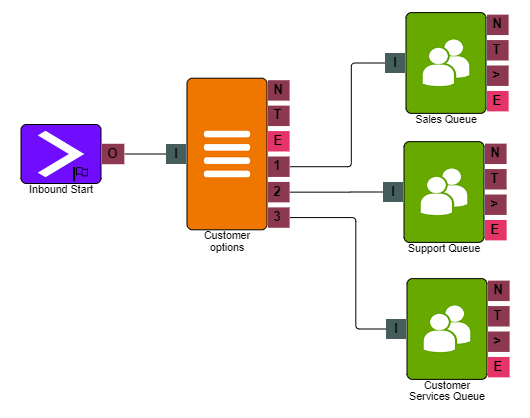
Jump
If you have an IVR that is very long and complex, you can split it up as pages within the IVR designer. The jump element allows you to jump to another page to continue the IVR.

I = Input
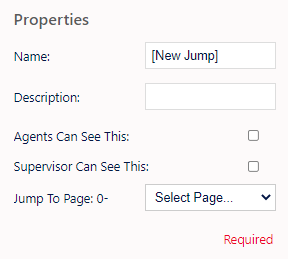
Name, Description - On each IVR element, you can add a name and a description of the element.
Agent Can See This - If this is checked, when an agent is on a call to a customer, they can select this element from the transfer drop-down under Workflow.
Supervisor Can See This - Anyone with the role type set as 'supervisor' within their main role, will be able to see the option but no-one else.
Jump To Page - You can select another page of the IVR to 'Jump to'. This is purely used to help you organise the IVR to keep it manageable. Long IVRs can become very complicated so splitting it into pages can help make it easier to use.
Play
Allows you to play an audio file to the caller in the IVR.
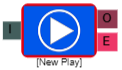
I = Input
O = Output
E = Error
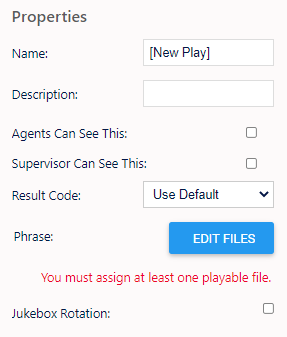
Name, Description - On each IVR element, you can add a name and a description of the element.
Agent Can See This - If this is checked, when an agent is on a call to a customer, they can select this element from the transfer drop-down under Workflow.
Supervisor Can See This - Anyone with the role type set as 'supervisor' within their main role, will be able to see the option but no-one else.
Result Code - You can assign a result code to the IVR element.
Phrase - You can select a phrase/music to be played at this stage of the IVR.
Queue
Here you can allocate skill groups/queues for the call to be routed to.
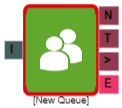
I = Input
N = No Staff
T = Timeout
> = Over EQT
E = Error
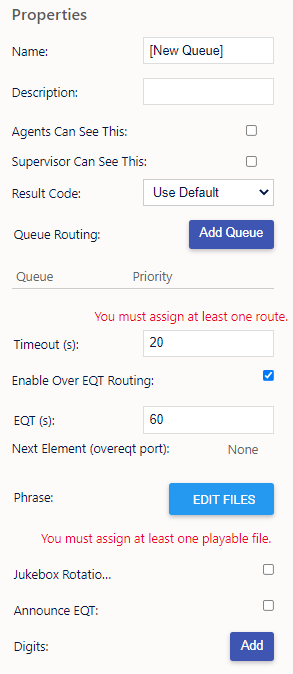
Name, Description - On each IVR element, you can add a name and a description of the element.
Agent Can See This - If this is checked, when an agent is on a call to a customer, they can select this element from the transfer drop-down under Workflow.
Supervisor Can See This - Anyone with the role type set as 'supervisor' within their main role, will be able to see the option but no-one else.
Result Code - You can assign a result code to the IVR element.
Queue Routing Add Queue - Clicking this will produce a drop-down where you can select a queue. You can add more than one queue and can set a priority out of 10 for each queue, 1 being the lowest and 10 being the highest priority.
 Note - For more information on configuring queues, please see our Queues guide.
Timeout - You can set the amount of time before moving the customer to the timeout route.
Enable Over EQT Routing - Checking this will move the customer down the 'over EQT' route. This puts them into a different element such as a message to say 'leave a number for a call back'.
EQT (s) - If EQT is over this it will move the customer to the Next Element.
Next Element (overeqt port) - Displays where the customer will be sent next (The element the EQT route is connected to).
Phrase - You can select a phrase/music to be played at this stage of the IVR.
Jukebox Rotation - When more than one 'phrase' is added, checking here will play all the 'phrases' in a random order.
Announce EQT - Checking this will play the EQT at the start of the queue and periodically (every 3 minutes). If the EQT was announced previously on a 'Command IVR Element', the EQT would not be played at the start of the Queue but would still be played every 3 minutes.
Digits Add - Clicking here will add a digit for the customer to select e.g. 'Press 1 for sales' etc. The more you add, the more options appear on the IVR element.
Digits can be edited by selecting them on the right (Limited to one digit). They can also be deleted by clicking the X next to them.
No staff route on IVR Queue element
It's worth noting that your IVR queue elements have a 'no staff' [N] option which, when there are no users logged in (that are assigned to the queue), will route the customers calls down the set route.
Blackout Days
This element will allow you to add certain closed dates into your IVR which will route to your out of hours message. This can be placed at the beginning of your inbound IVR before the time check element.

I = Input
N = No Match
T = True
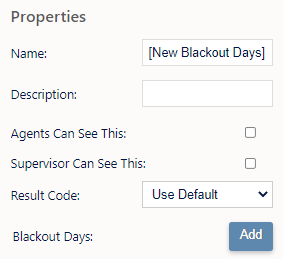
Name, Description - On each IVR element, you can add a name and a description of the element.
Agent Can See This - If this is checked, when an agent is on a call to a customer, they can select this element from the transfer drop-down under Workflow.
Supervisor Can See This - Anyone with the role type set as 'supervisor' within their main role, will be able to see the option but no-one else.
Result Code - You can assign a result code to the IVR element.
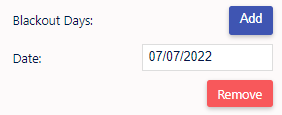
Blackout Days - Clicking this will allow you to add another date to the element (Max 7 per element).
Date - After clicking ADD on the above, you can select a date from a date picker.
Example
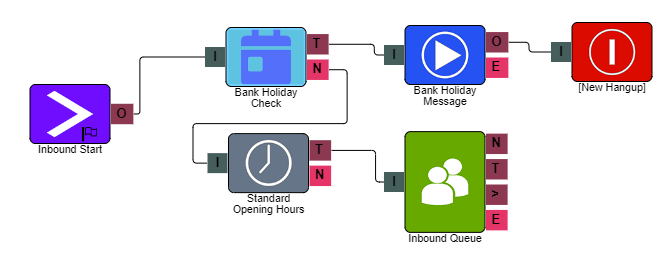
The example below has a blackout days element before the opening hours time check which checks for bank holidays. When a caller enters the inbound IVR, if the configured dates match on the bank holiday the call will route to a pre-recorded message specific for the bank holiday. On any other date that does not match what we have configured, the call follows the No Match (N) route and links into the standard IVR.
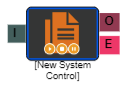
System Control
The 'System Control' element would be used by internal staff and would not be present within a customer facing inbound route. This element will allow you to switch on/off emergency routing or to start, pause & stop campaigns. This element is useful if you need to activate the emergency routing or update a campaign status when you don't have immediate access to the MaxContact manager portal.
I = Input
O = Output
E = Error
Name, Description - On each IVR element, you can add a name and a description of the element.
Agent Can See This - If this is checked, when an agent is on a call to a customer, they can select this element from the transfer drop-down under Workflow.
Supervisor Can See This - Anyone with the role type set as 'supervisor' within their main role, will be able to see the option but no-one else.
Result Code - You can assign a result code to the IVR element.
Control Action - You can select the following actions here;
Stop Campaign - Start Campaign - Pause Campaign - Global Emergency
Note - Selecting 'global emergency' removes the Campaign Type option below as it applies emergency routing to the whole system not individual campaigns.
Campaign Type - Here, you can select the campaign you want the control action to apply to.
Example
In the below example, when calling into the IVR you are presented with 4 options;
- Pause the campaign
- Stop the campaign
- Start/Play the campaign
- Initiate Emergency Routing Protocol
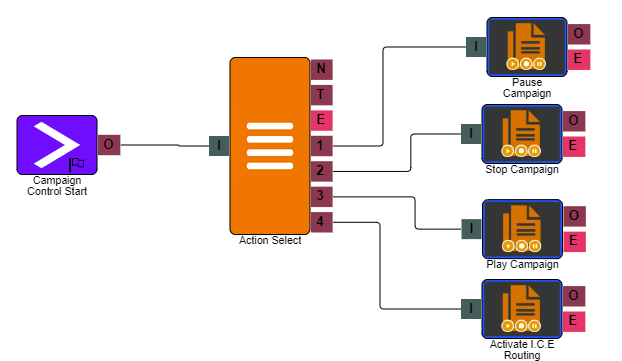
For more on Emergency Routing, click here.
By selecting an option with the keypad, the selected campaign will Pause/Stop/Play or the Emergency Routing will be switched on. This can only be switched off again by logging into MaxContact and using the Inbound Number page.
Note - If you have more than one campaign, you will need to set up similar to above but with more options for each campaign to pause/stop/start. Global Emergency only requires 1 option.