Overview
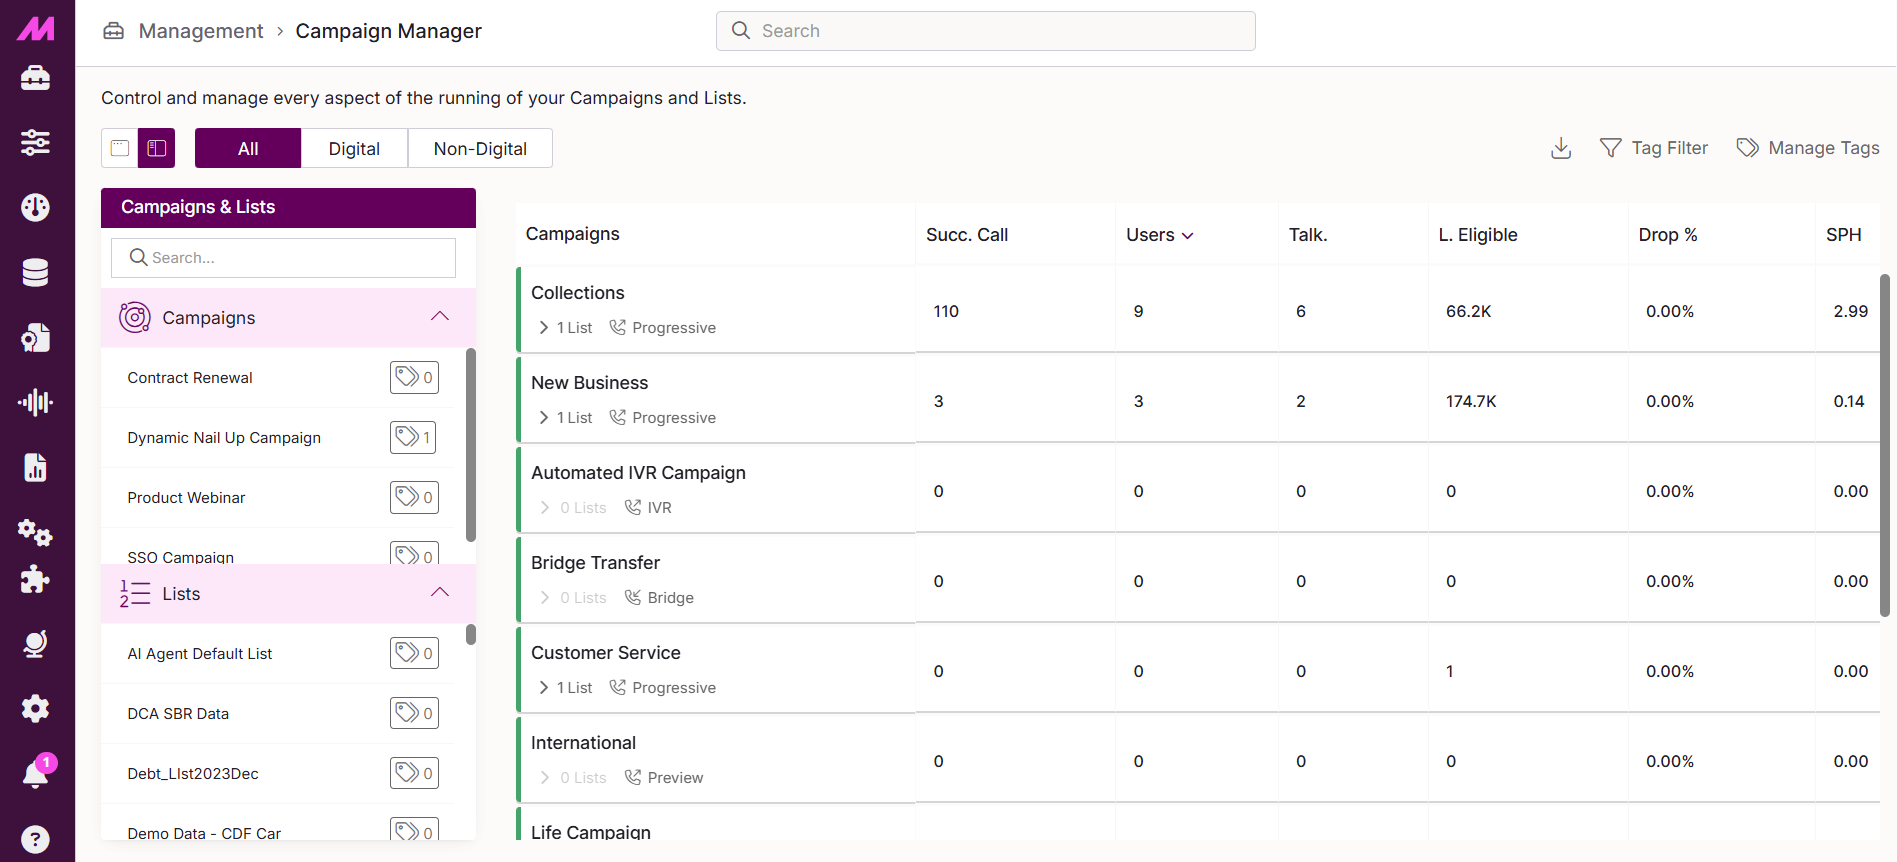
The Campaign Manager page gives you a real-time view of all campaigns loaded into the system. From here you can start, pause, and stop campaigns, add and remove lists, monitor data levels, and adjust certain running settings. It is your primary operational control point for managing campaigns day to day.
To access it, go to Management > General > Campaign Manager.
Note. Campaign Manager displays campaigns and lists that are already set up on the system. To create or fully configure a campaign, use the CTU page. To create or configure a list, use the Lists page. Changes to campaign or list names, scripts, result code plans, and other core configuration must be made on those pages — these cannot be changed from Campaign Manager.
Page controls
The controls across the top of the page let you change the view and access additional features.
| Control | Description |
|---|---|
Hide/show panel | Hides the holding area panel on the left to give the main grid more screen space. Select again to bring the panel back. |
All campaigns | Shows all campaigns in the main grid regardless of type. |
Digital only | Filters the main grid to show only digital campaigns. |
Non-digital only | Filters the main grid to show only voice campaigns. |
Download to Excel | Downloads a snapshot of all stats currently visible on the Campaign Manager page as an Excel file. |
Tag filter | If tagging is enabled on your system, filters the page to show only campaigns and lists that have specific tags applied. Access depends on your tagging permissions. |
Tag Manager shortcut | Opens the Tag Manager page in a new browser tab. Only visible if tagging is enabled. |
Page layout
The page is split into two main areas.
Holding area
The left-hand panel contains two sections: all active campaigns configured in the system, and all active lists. These items are waiting to be loaded into the main grid.
- Campaigns — all campaigns with the Active checkbox ticked in CTU. They may or may not be fully configured.
- Lists — all lists marked as active in the Lists page, with or without data.
Use the search bar in the holding area to find a specific campaign or list quickly. Items in the holding area cannot be configured from this panel — any changes to a campaign or list must be made on the relevant page (CTU — Campaigns or Lists).

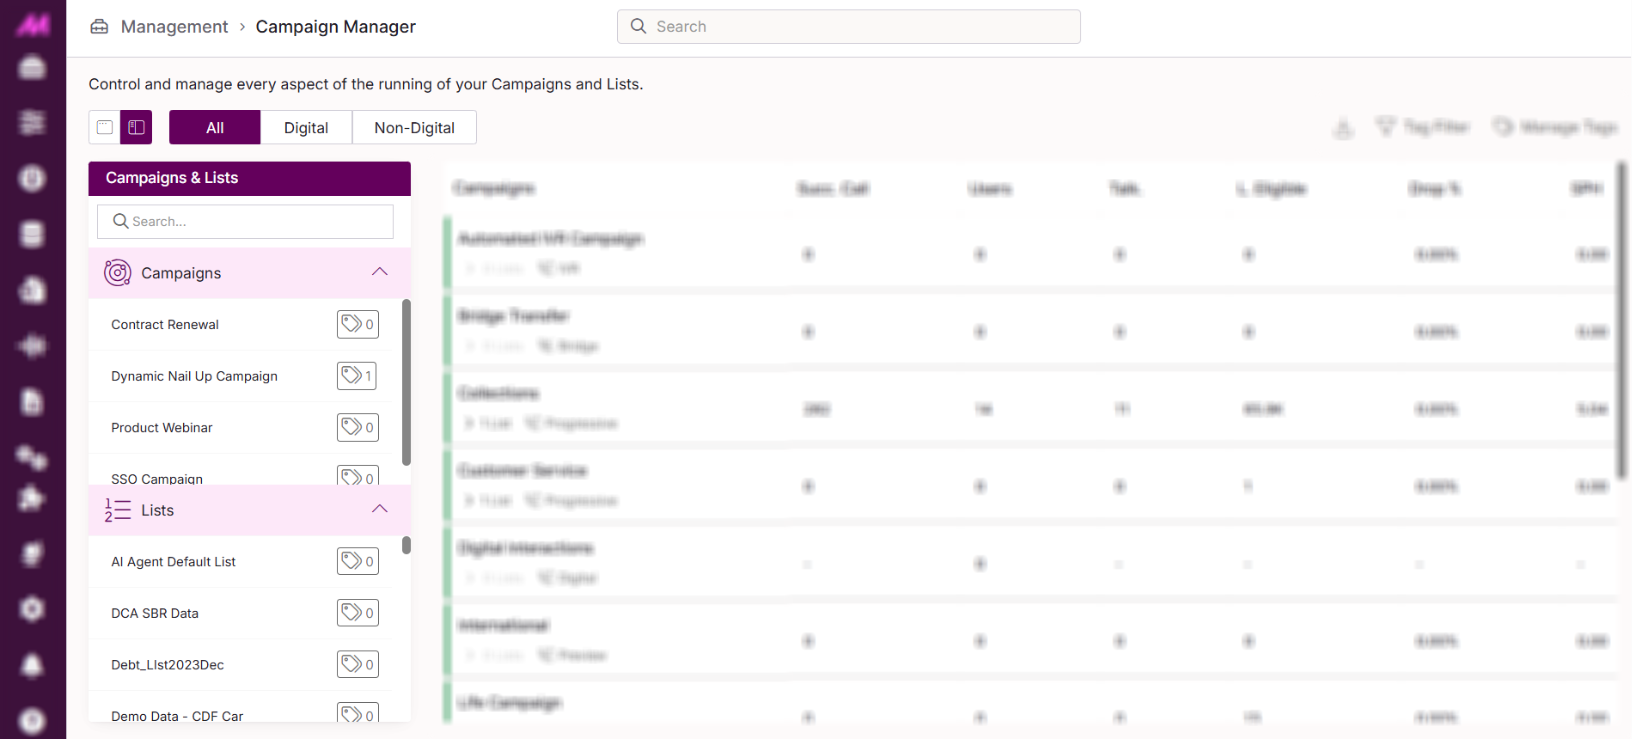
Main grid
The main grid shows all campaigns that have been loaded in and are either running or paused. Both voice and interaction campaigns appear here. This is where you monitor live campaign performance and carry out operational actions.
Adding campaigns and lists
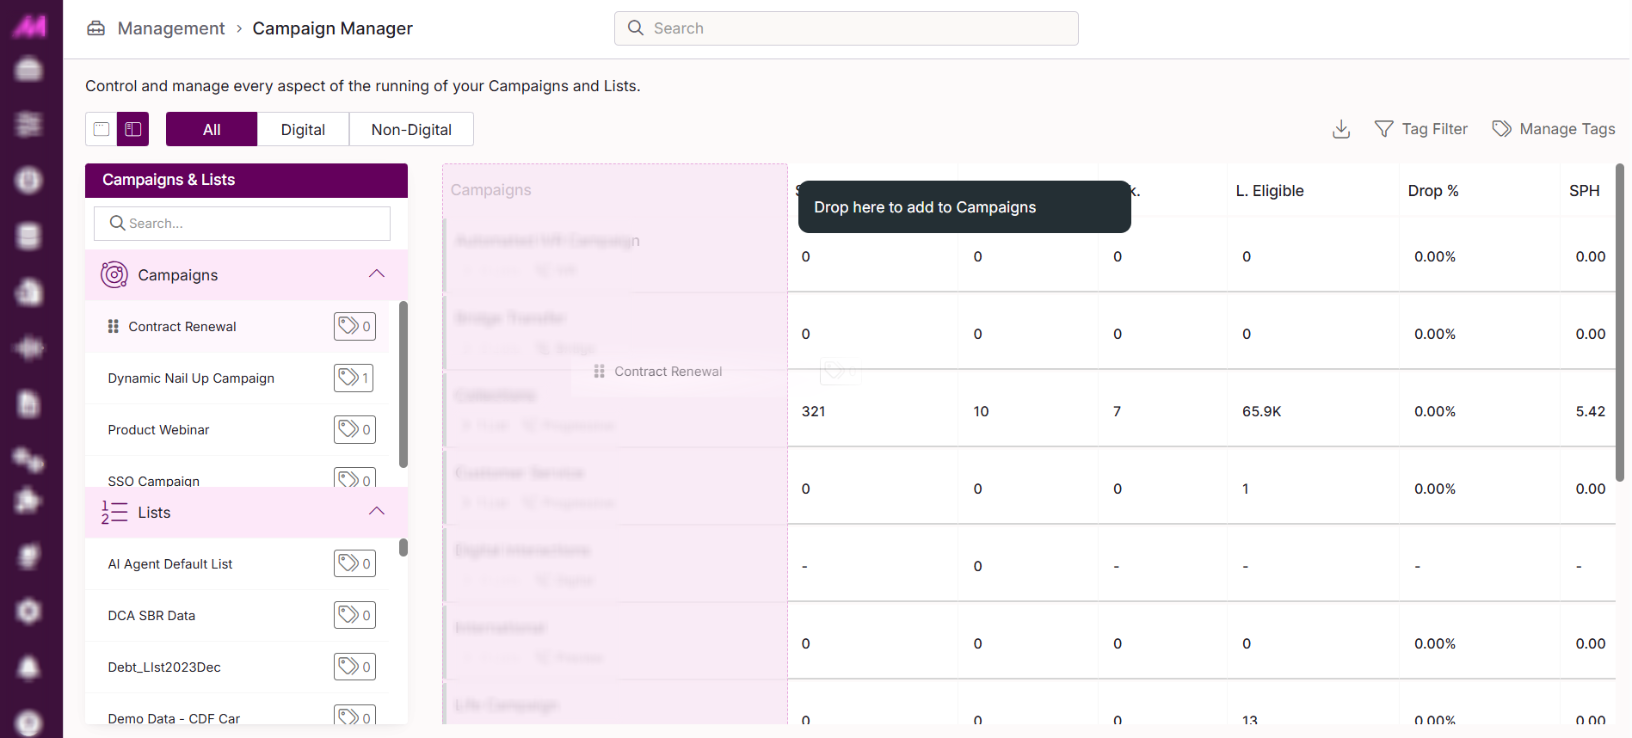
Adding a campaign to the grid
Click and drag a campaign from the holding area and drop it anywhere in the main grid. The campaign will appear in the grid ready to be started.
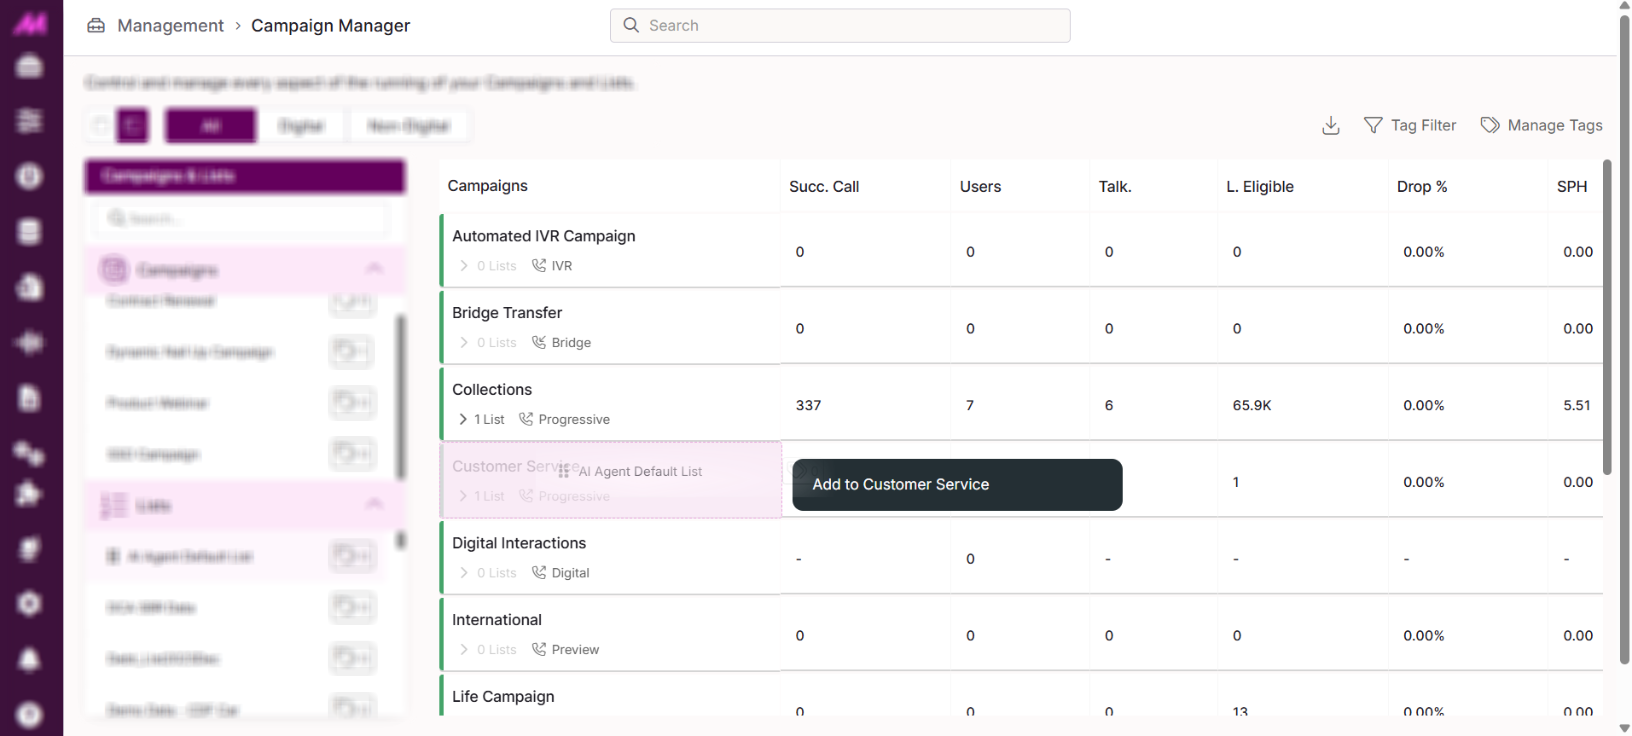
Adding a list to a campaign
Click and drag a list from the holding area and drop it onto the relevant campaign in the main grid. Take care to release the list onto the correct campaign row.
Note. When adding a list that contains data, the data column may take up to two minutes to populate. Allow the system enough time to update before contacting support.
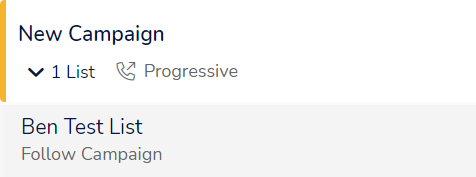
Viewing lists in a campaign
Click the arrow beneath a campaign name to expand it and see all lists currently assigned to it.
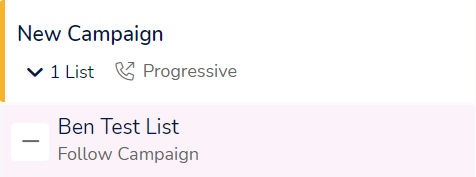
Removing a list from a campaign
Hover over the list row in the grid and click the – icon in the actions column. A confirmation dialogue will appear before the list is removed.
Campaign states
Each campaign in the grid shows one of two states:
| State | Description |
|---|---|
Running (green) | The campaign is active. Calling campaigns will dial leads if agents are logged in and ready. Interaction campaigns will pull through interactions if agents are logged in and ready. |
Paused (amber) | The campaign is paused. No new calls or interactions are being initiated, but any that are already active will continue until completed and dispositioned. |
Campaign column icons
Status icons may appear in the campaign column to indicate specific conditions.
| Icon | Description |
|---|---|
No lists | No lists are currently assigned to this campaign. |
No valid schedule | A schedule is set on the campaign but it does not cover the current day or time. The icon does not appear if no schedule is assigned or if the current time falls within the scheduled window. |
Data alert  | A data alert threshold has been reached. Amber indicates data is running low; red indicates data has run out. A toast message will also appear on screen. Hover over the icon for more detail, or open the campaign settings panel on the right to see the alert information. Alerts can be configured via CTU or Lists. |

Campaign actions
Hover over a campaign in the grid and click the three dots icon to access the following actions.
Access to start, stop, and pause campaigns is controlled by the Start Stop Pause Campaign permission.
| Action | Description |
|---|---|
| Start campaign | Starts the campaign. Can also be started from the campaign settings panel on the right by selecting Play from the dropdown. |
| Pause campaign | Pauses the campaign. No new calls or interactions are initiated. Any active calls continue until completed. Can also be paused from the campaign settings panel. |
| Stop campaign | Stops the campaign entirely. A confirmation dialogue appears warning that all agents will be removed from the campaign, any active interactions will be cancelled, and the campaign and its lists will be moved back to the holding area. This also removes the campaign from all user groups. If it is added back to the grid, it will appear in the default grid for all users. |
| Clear fetched data | Clears the campaign's lead buffer so the system fetches fresh data from the assigned lists. Useful when new data has been added to a list and you want it to be called sooner. This requires the Campaign Manager Clear Fetched Data permission. Use sparingly — emptying the buffer can increase wait times for agents. |
| Pin campaign | Pins the campaign to the top of the grid (or group if it belongs to one). If multiple campaigns are pinned, they appear in the order they were pinned. Select Remove pin to return the campaign to its default position. |
| Re-order campaigns | Click and drag any campaign to a new position in the grid. A pink bar indicates where it will be placed on release. Grid order is saved to your account automatically and does not affect other users' views. |
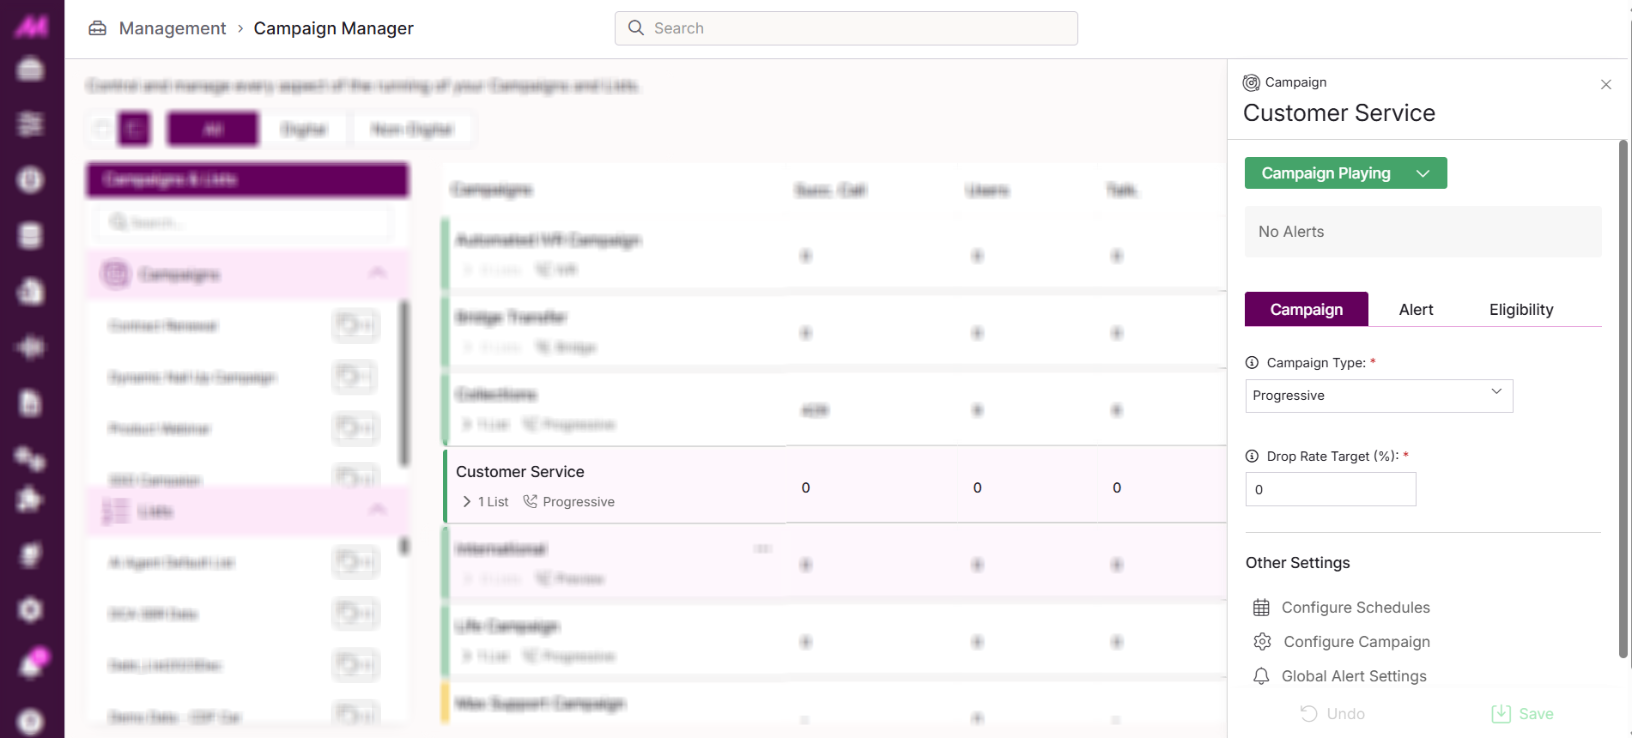
Campaign settings panel
Clicking on a campaign in the grid opens its settings panel on the right. This panel shows the campaign's current state and provides controls for certain operational settings. It also contains shortcuts to relevant configuration pages.
Note. The settings available in this panel apply to the campaign while it is running. They do not replace the full campaign configuration in CTU. Settings such as campaign name, script, result code plan, and team assignments must be changed there.
Campaign state control
The dropdown at the top of the panel lets you switch the campaign between Play, Pause and Stop.
Alerts
Any active data alerts for this campaign are shown here, including which lists are low on data, remaining data volumes, and total eligible data for the campaign. Hover over an alert for more detail.
Campaign settings — dialling type
For voice campaigns, certain settings can be adjusted directly from the side panel. The options available depend on the campaign type.
| Mode | Description |
|---|---|
| Predictive | The system dials multiple leads simultaneously and distributes answered calls to available agents. Recommended minimum of 6 agents. Two additional settings are available here: Drop rate target. Sets the maximum acceptable drop rate percentage. The platform adjusts its dialling speed to stay at or below this target. Requires the Drop Rate Settings permission. Undroppable. Enables an alternative algorithm that aims to keep the drop rate as close to 0% as possible. When enabled, the drop rate target is bypassed. |
| Progressive | The system dials one lead per agent, while also allowing inbound calls to come in. A drop rate target can also be set here, though dropped calls are rare in progressive mode. Requires the Drop Rate Settings permission. |
| Preview | Gives agents a set period to review the lead before the system dials. No additional settings are available in this mode. |
| Inbound | No settings are available for inbound campaigns in this panel. To change an inbound campaign's setup, go to CTU. |
| Bridge | Only the maximum number of concurrent transfer lines can be set here (0–999). This limits the number of simultaneous transfers over the bridge campaign. |
| Digital | No settings are available for digital campaigns in this panel. To modify a digital campaign, go to CTU. |
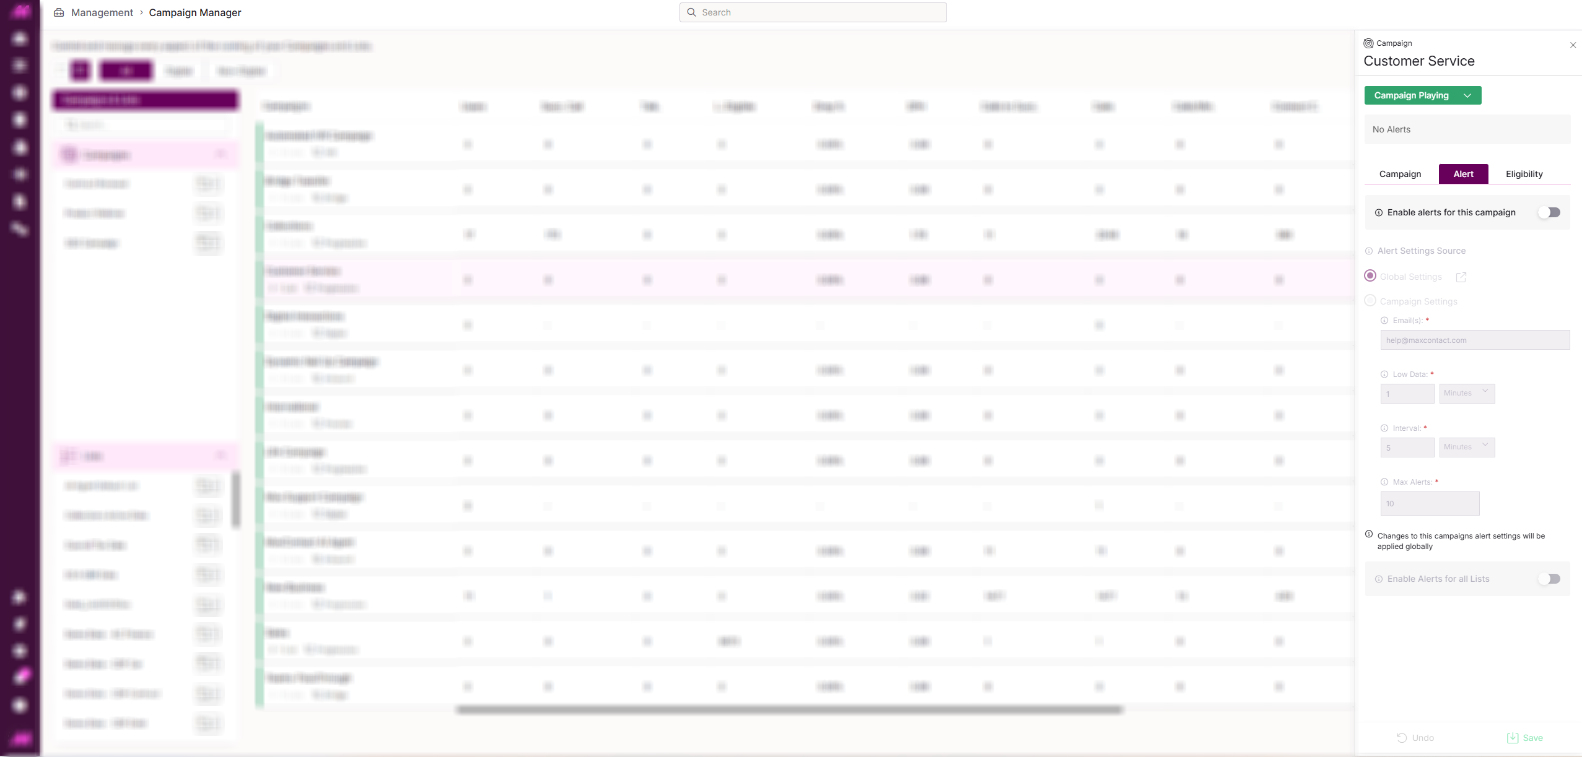
Alert settings
Toggle alerts on or off for this campaign. When enabled, low data alerts appear on the Campaign Manager page and are also sent via email.
The alert source can be set to use the global settings (configured in Settings) or campaign-specific settings. If campaign-specific settings are selected, you can configure the alert email address, low data threshold, interval, and maximum number of alerts directly in this panel.
Note. Alerts cannot be set on digital campaigns.
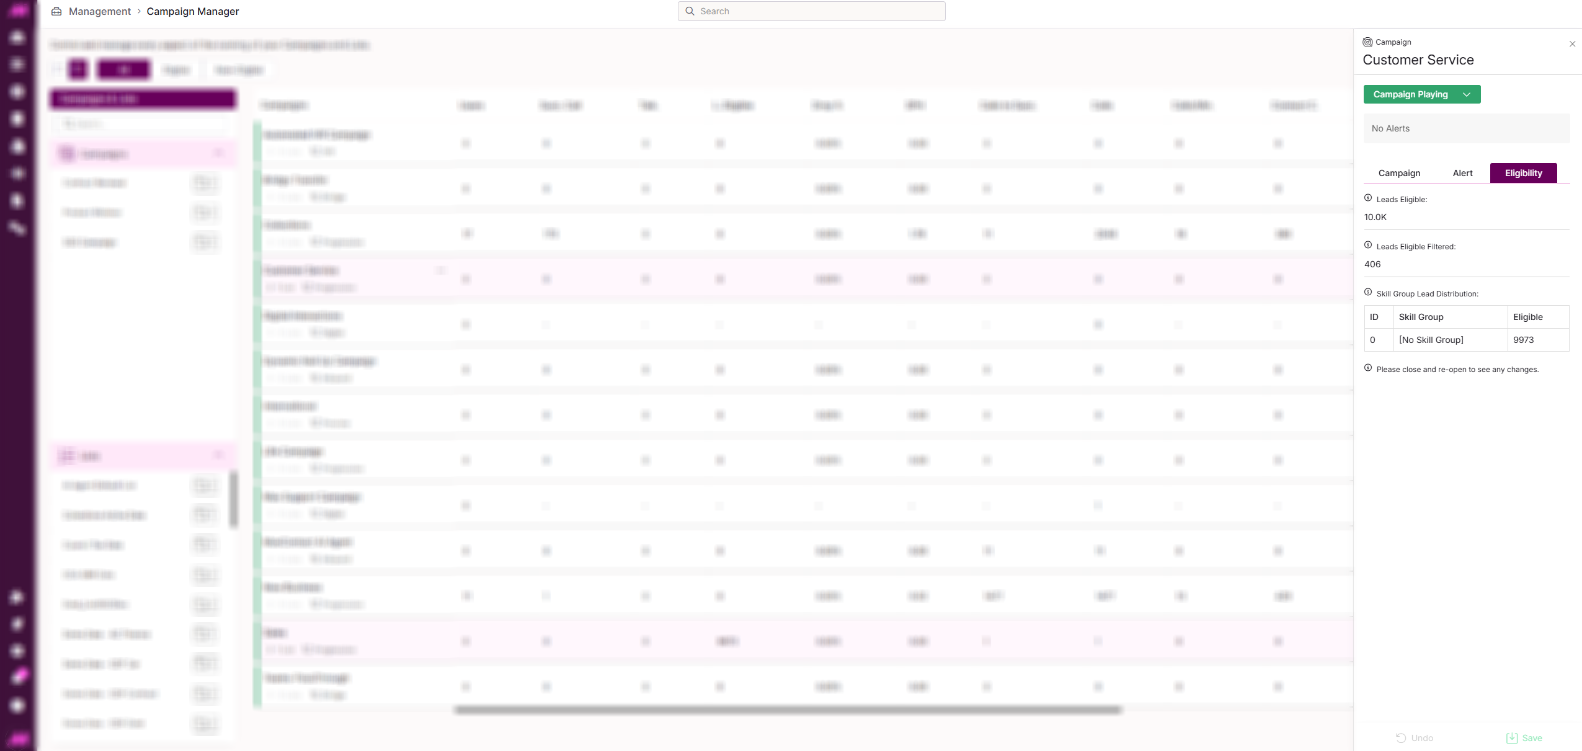
Eligibility view
Shows a live count of eligible data for this campaign.
| Field | Description |
|---|---|
| Leads eligible | Total number of leads currently eligible to be dialled across all lists in this campaign. |
| Leads eligible filtered | Total eligible leads based on the Custom Data Fetching plan applied to the campaign's lists. |
| Leads eligible skilled | Total leads that are both eligible and matched to the skills of agents currently logged in. See Outbound Skill-Based Routing for more detail. |
| Skill group lead distribution | A breakdown of eligible data grouped by skill group, with the corresponding logged-in users shown alongside each group. |
Shortcuts
The Other Settings sections in the campaign and list panels contain shortcuts to relevant configuration pages: Configure schedules, Configure campaign, Global alert settings, Record History, Configure Plans, Configure Result Codes, and Configure this List. These are navigation links only — they open the relevant page where changes can be made.
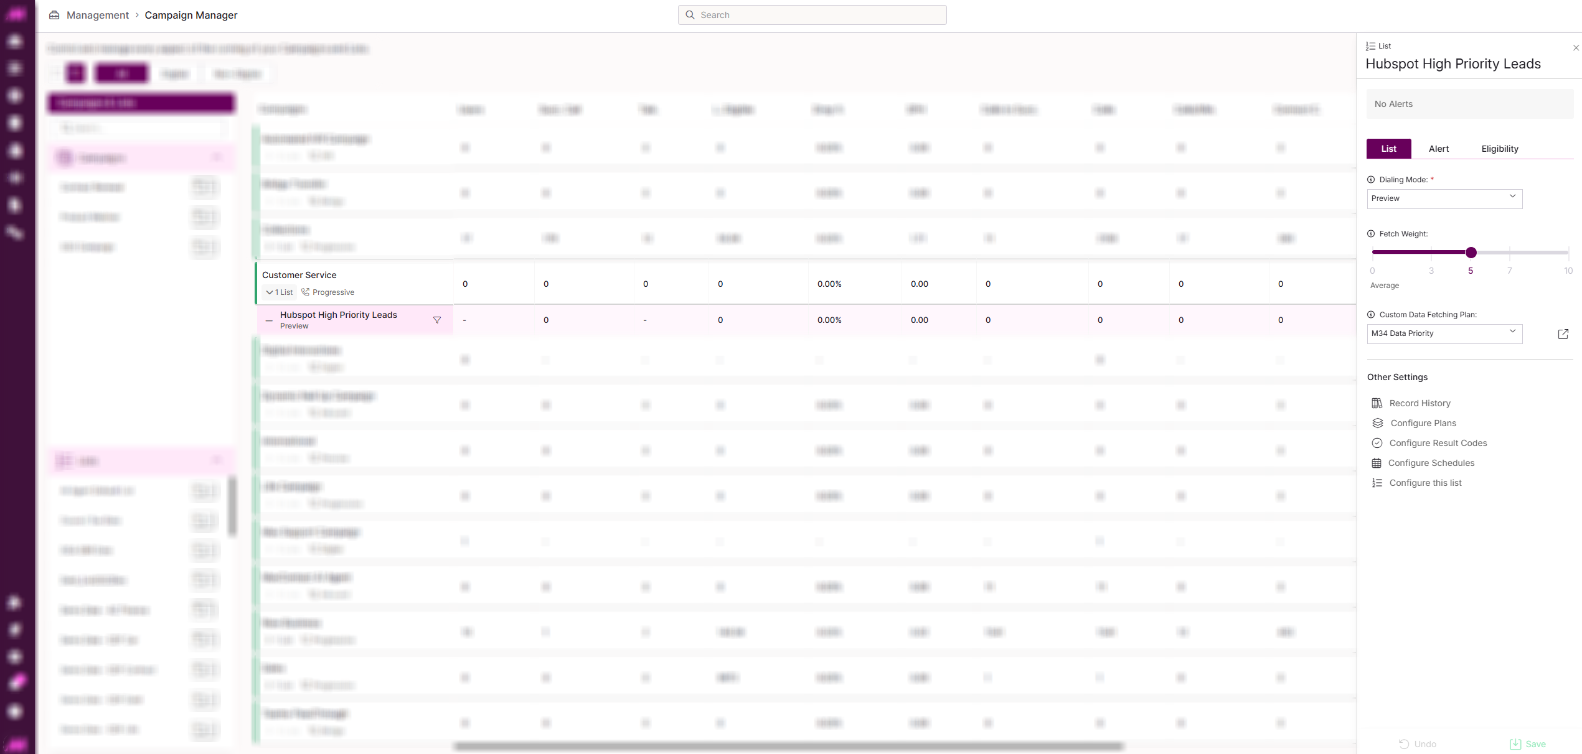
List settings panel
Clicking on a list row in the grid opens its settings panel on the right.
List settings
| Setting | Description |
|---|---|
| Dialling mode | Controls how leads in this list are dialled. Follow Campaign Type dials the list the same way as the campaign. Preview dials all leads in this list in preview mode regardless of how the campaign is set up. |
| Fetch weight | A sliding scale that controls how many calls are fetched from this list relative to others in the same campaign. Higher numbers mean more calls fetched from this list. Lists set to the same value are fetched equally. |
| Custom Data Fetching plan | Assigns a Custom Data Fetching plan to this list to control which leads are called and in what priority. Requires the Can Access Custom Data Fetching permission. The shortcut takes you to the Plans page to configure the CDF plan. |
Customising the grid
The main grid can be customised to display the information most relevant to you. Changes save automatically to your account and do not affect what other users see.
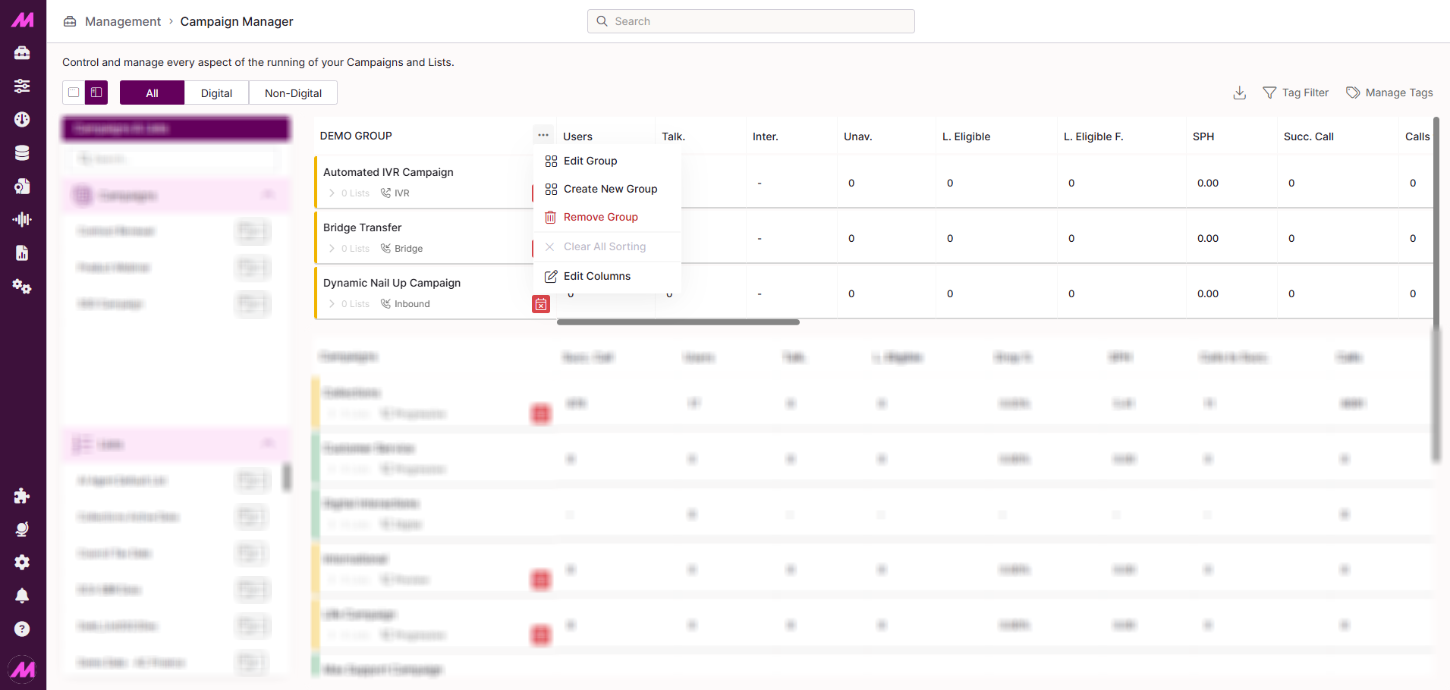
Grouping campaigns
Click the column header in the campaign column and select Create new group to combine multiple campaigns into a named group. Groups appear at the top of the grid under the group name.
Once a group exists, hovering over the group header gives the following options:
| Option | Description |
|---|---|
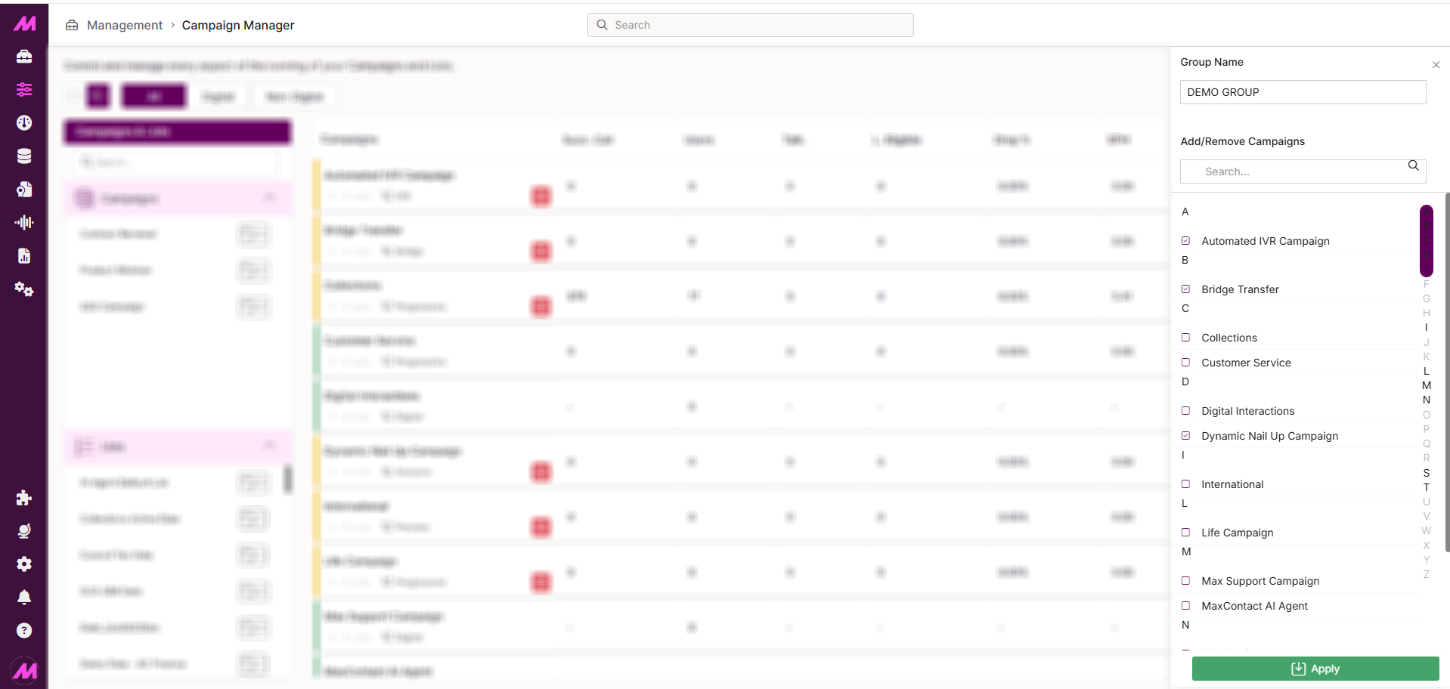
| Edit group | Add or remove campaigns from the group, or rename it. |
| Create new group | Adds another group to the grid. |
| Remove group | Deletes the group. All campaigns within it return to their default position in the grid. |
| Edit columns | Customise which stat columns are shown for this group. |
Select Clear all sorting from the campaign column header to reset any grouping or sorting back to the default.
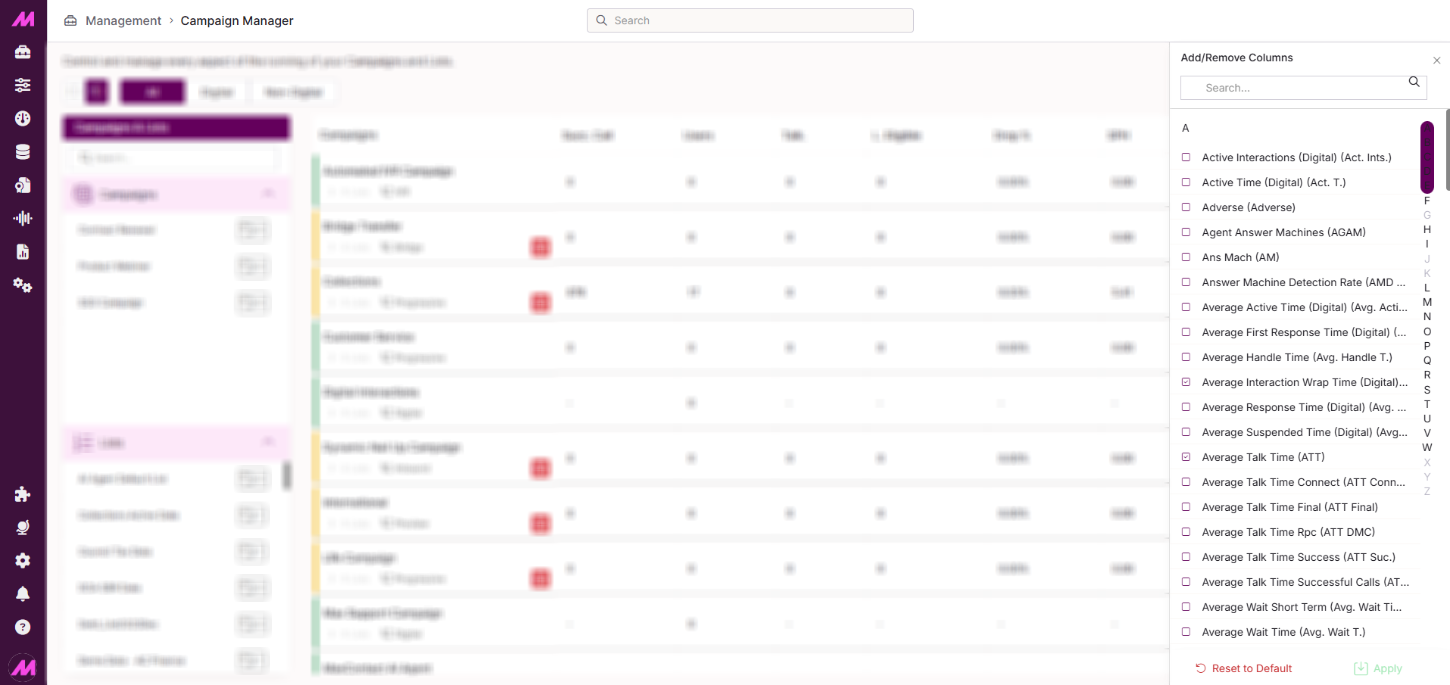
Editing stat columns
Click the campaign column header and select Edit columns to open a panel with over 100 statistics to choose from. Select or deselect stats to add or remove them from the grid. Use the search box to find a specific stat quickly. Click Apply to confirm your changes.
Once added, columns can be reordered by dragging them to a new position. To reset the grid to its default column set, use the reset option in the Edit columns panel.
Sorting columns
Hover over any column header to access sort options.
| Option | Description |
|---|---|
| Sort ascending | Sorts the grid by this column in ascending order. |
| Sort descending | Sorts the grid by this column in descending order. |
| Clear sorting | Removes the sort applied to this column. |
| Edit columns | Opens the stat column selection panel. |
| Remove column | Removes the selected column from the grid entirely. |
Multiple columns can be sorted at the same time by selecting sort options one after the other. You can also click a column header directly to toggle sorting.