
Overview
The Permissions page is where you control what each user can see and do within MaxContact. Permissions are managed through roles (also called permission groups) — predefined sets of permissions that you assign to users. You can use the default roles that come with the system, clone and customise them, or build new ones from scratch.
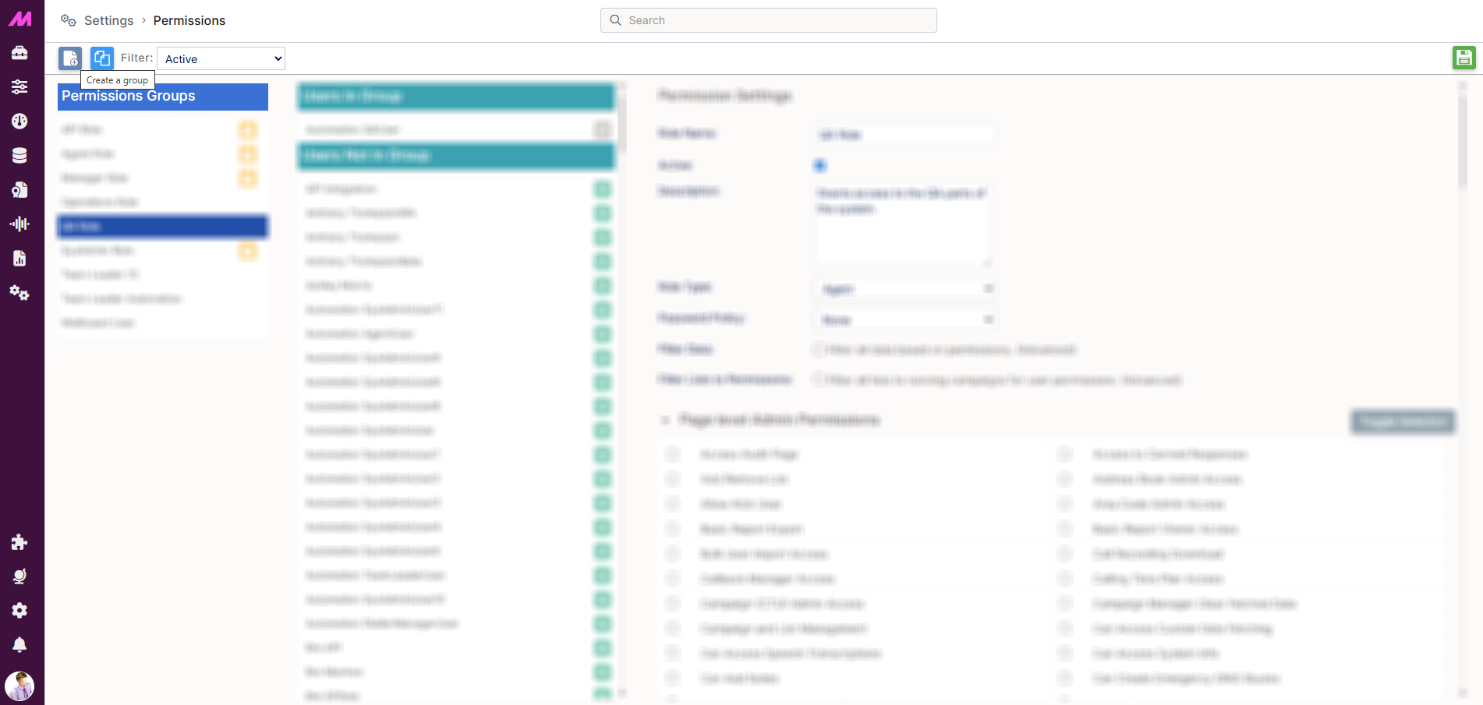
To access it, go to Settings > Advanced > Permissions.
Note. After making changes to a permission group, make sure the user logs out and back in for the changes to take effect.
Page controls
| Control | Description |
|---|---|
| Create a group | Creates a new role/permission group. |
| Clone role | Creates a copy of the currently selected role with all its permission settings intact. Useful when creating a new role that is similar to an existing one. |
| Filter | Filters the permission groups list to show All, Active, or Inactive roles. |
| Save | Saves all changes made on the page. Always save before navigating away or your changes will be lost. |
Default roles
The following roles are available on the system by default. Each can be used as-is, cloned and customised, or assigned directly to users.
| Role | Description |
|---|---|
| Agent Role | Grants access to Contact Hub with most standard agent features available. |
| API Access Role | Used for live data push integrations via the MaxContact API. |
| Manager Role | Grants access to dashboards, real-time displays, and list management. |
| QA Role | Grants access to the QA areas of the system. Information is restricted to the user's own team. |
| Sys Admin | The highest access level available. Grants access to all applications and areas of the system. |
| Team Leader Role | Grants access to dashboards, real-time displays, and list management. Restricts changes to campaigns, teams, and users outside the user's own team. |
For a full breakdown of what each default role includes, see the Default roles in MaxContact guide.
Creating a new role
- Click Create a group at the top of the page. A new blank role will appear in the permission groups list.
- Enter a name for the role in the Role Name field in the right-hand panel.
- Add the users you want in this role by clicking the + symbol next to their name in the Users panel. If you haven't created your users yet, do that first via the CTU.
- Configure the role settings. See the Role settings section below for a full description of each option.
- Tick the permissions you want this role to have in the permissions list.
- Click Save before navigating away from the page.
Assigning users to roles
Click on a permission group in the left-hand panel to open it. The Users in Group panel shows all users currently assigned to that role.
- Click the + symbol next to a user to add them to the role
- Click the – symbol next to a user to remove them from the role
Clicking on a user in the panel displays a star next to every role they are currently assigned to, making it easy to see a user's full permissions at a glance.
Note. Assigning a user to multiple permission groups can cause conflicting permission issues. It is strongly recommended to assign each user to only one role. If a user needs access to features from different roles, clone the most appropriate role and combine the permissions into a single custom role instead.
Role settings
Clicking on a role loads its settings in the right-hand panel. The fields at the top of the panel control the role's general behaviour before you reach the individual permission checkboxes.
| Field | Description |
|---|---|
| Role name | The name of the role. Can be edited at any time. Shown in the permission groups list on the left. |
| Active | When ticked, the role is active, and its permissions apply to assigned users. Untick to deactivate the role without deleting it. |
| Description | A free-text description of the role and its intended use. Useful for distinguishing between similar roles as the number of custom roles grows. |
| Role type | Groups the role into a category for organisational purposes. Does not affect the permissions granted. |
| Password policy | Assigns a password policy to users in this role. Password policies are created and managed in Plans. |
| Filter data | When checked, users in this role can only view campaigns, lists, and recordings associated with the teams they belong to. Restricts visibility to their own scope of work. |
| Filter lists to permissions | When checked, users in this role can only see lists for the running campaigns they are part of when viewing dashboards. Narrows the dashboard view to their active campaigns only. |
Below these settings, all available permissions are listed as individual checkboxes. Tick or untick each one to grant or remove that permission for users in this role. For a full reference of what each permission does, see the Permission Definitions article.